linux学习文档详细版.docx
《linux学习文档详细版.docx》由会员分享,可在线阅读,更多相关《linux学习文档详细版.docx(18页珍藏版)》请在冰点文库上搜索。
linux学习文档详细版
cdcdlinux学习文档(修订版)
2008年11月
一、最小安装组件
(略)
二、Vsftpd的配置相关
(一)可用root与anoymous登录ftp
1、启动:
Servicevsftpdstart|resetart|stop
2、配置文件:
/etc/vsftpd/vsftpd.conf
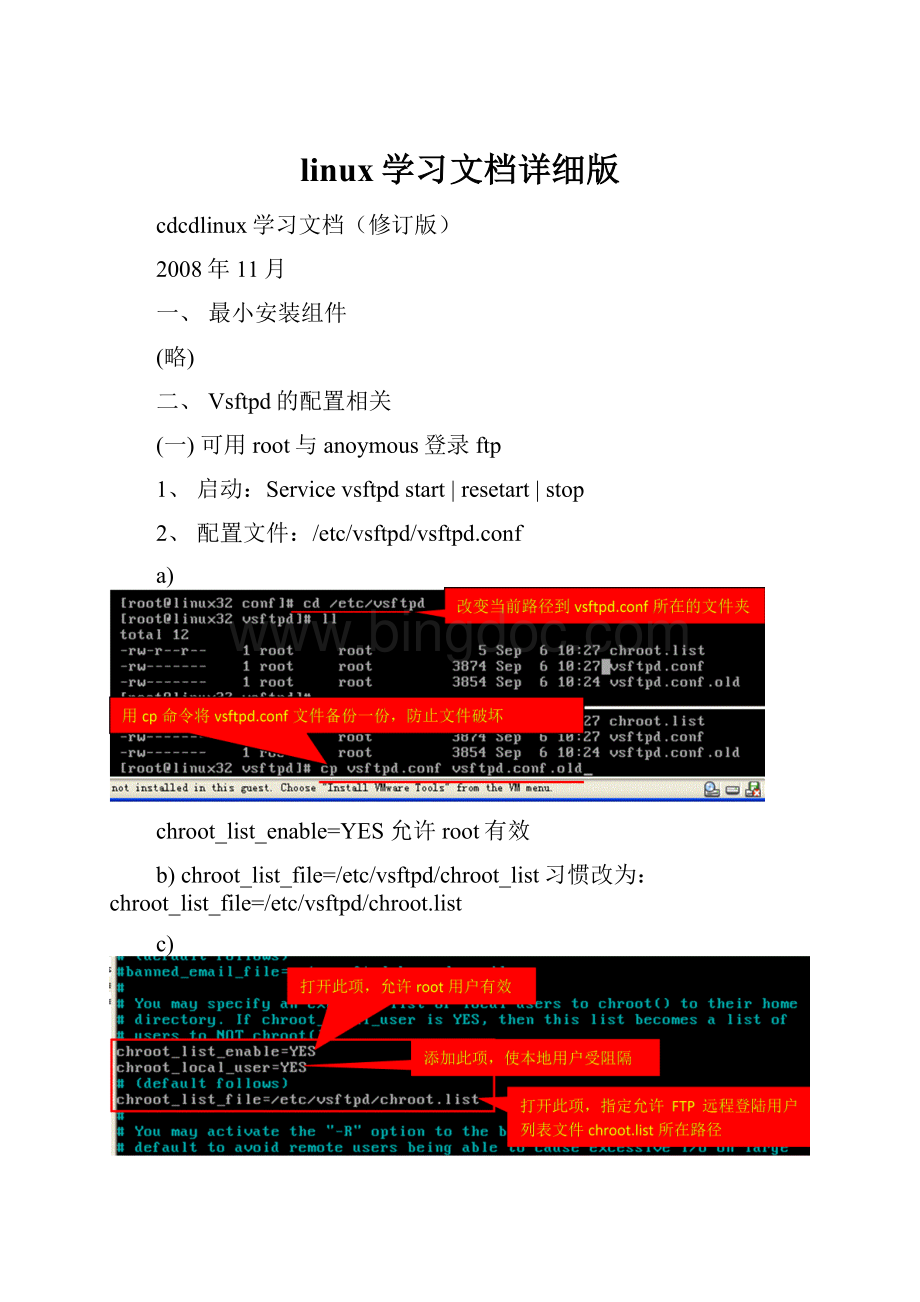
a)
chroot_list_enable=YES允许root有效
b)chroot_list_file=/etc/vsftpd/chroot_list习惯改为:
chroot_list_file=/etc/vsftpd/chroot.list
c)
添加chroot_local_user=YES本地用户受阻隔
3、chroot.list文件内容:
添加用户root,以允许root访问
在/etc/vsftpd/下面用vimchroot.list命令建立一个chroot.list的新文件,文件内容为root即可。
4、/etc/vsftpd.ftpusers中,注释掉root用户
5、用vim命令编辑/etc/vsftpd.user_list文件,在root用户前加上“#”即可。
(二)使用anonymous在upload中上传文件
默认公用ftp目录:
/var/ftp/pub
1、mkdirupload
2、chmodo+wupload或chmod757upload
3、修改/etc/vsftpd/vsftpd.conf
a)anon_upload_enable=YES
b)
anon_mkdir_write_enable=YES
#Exampleconfigfile/etc/vsftpd.conf
#
#Thedefaultcompiledinsettingsareveryparanoid.Thissamplefile
#loosensthingsupabit,tomaketheftpdaemonmoreusable.
#
#AllowanonymousFTP?
anonymous_enable=YES
#
#Uncommentthistoallowlocaluserstologin.
local_enable=YES
#
#UncommentthistoenableanyformofFTPwritecommand.
write_enable=YES
#
#Defaultumaskforlocalusersis077.Youmaywishtochangethisto022,
#ifyourusersexpectthat(022isusedbymostotherftpd's)
local_umask=022
#
#UncommentthistoallowtheanonymousFTPusertouploadfiles.Thisonly
#hasaneffectiftheaboveglobalwriteenableisactivated.Also,youwill
#obviouslyneedtocreateadirectorywritablebytheFTPuser.
anon_upload_enable=YES
#
#UncommentthisifyouwanttheanonymousFTPusertobeabletocreate
#newdirectories.
anon_mkdir_write_enable=YES
#
#Activatedirectorymessages-messagesgiventoremoteuserswhenthey
#gointoacertaindirectory.
dirmessage_enable=YES
#
#Activateloggingofuploads/downloads.
xferlog_enable=YES
#
#MakesurePORTtransferconnectionsoriginatefromport20(ftp-data).
connect_from_port_20=YES
#
#Ifyouwant,youcanarrangeforuploadedanonymousfilestobeownedby
#adifferentuser.Note!
Using"root"foruploadedfilesisnot
#recommended!
#chown_uploads=YES
#chown_username=whoever
#
#Youmayoverridewherethelogfilegoesifyoulike.Thedefaultisshown
#below.
#xferlog_file=/var/log/vsftpd.log
#
#Ifyouwant,youcanhaveyourlogfileinstandardftpdxferlogformat
xferlog_std_format=YES
#
#Youmaychangethedefaultvaluefortimingoutanidlesession.
#idle_session_timeout=600
#
#Youmaychangethedefaultvaluefortimingoutadataconnection.
#data_connection_timeout=120
#
#Itisrecommendedthatyoudefineonyoursystemauniqueuserwhichthe
#ftpservercanuseasatotallyisolatedandunprivilegeduser.
#nopriv_user=ftpsecure
#
#EnablethisandtheserverwillrecogniseasynchronousABORrequests.Not
#recommendedforsecurity(thecodeisnon-trivial).Notenablingit,
#however,mayconfuseolderFTPclients.
#async_abor_enable=YES
#
#BydefaulttheserverwillpretendtoallowASCIImodebutinfactignore
#therequest.TurnonthebelowoptionstohavetheserveractuallydoASCII
#manglingonfileswheninASCIImode.
#Bewarethatturningonascii_download_enableenablesmaliciousremoteparties
#toconsumeyourI/Oresources,byissuingthecommand"SIZE/big/file"in
#ASCIImode.
#TheseASCIIoptionsaresplitintouploadanddownloadbecauseyoumaywish
#toenableASCIIuploads(topreventuploadedscriptsetc.frombreaking),
#withouttheDoSriskofSIZEandASCIIdownloads.ASCIImanglingshouldbe
#ontheclientanyway..
#ascii_upload_enable=YES
#ascii_download_enable=YES
#
#Youmayfullycustomisetheloginbannerstring:
#ftpd_banner=WelcometoblahFTPservice.
#
#Youmayspecifyafileofdisallowedanonymouse-mailaddresses.Apparently
#usefulforcombattingcertainDoSattacks.
#deny_email_enable=YES
#(defaultfollows)
#banned_email_file=/etc/vsftpd.banned_emails
#
#Youmayspecifyanexplicitlistoflocaluserstochroot()totheirhome
#directory.Ifchroot_local_userisYES,thenthislistbecomesalistof
#userstoNOTchroot().
chroot_list_enable=YES
chroot_local_user=YES
#(defaultfollows)
chroot_list_file=/etc/vsftpd/chroot.list
#
#Youmayactivatethe"-R"optiontothebuiltinls.Thisisdisabledby
#defaulttoavoidremoteusersbeingabletocauseexcessiveI/Oonlarge
#sites.However,somebrokenFTPclientssuchas"ncftp"and"mirror"assume
#thepresenceofthe"-R"option,sothereisastrongcaseforenablingit.
#ls_recurse_enable=YES
pam_service_name=vsftpd
userlist_enable=YES
#enableforstandalonemode
listen=YES
tcp_wrappers=YES
三、httpd服务器
1、启动Servicehttpdrestart
2、
配置文件/etc/httpd/conf/httpd.conf
3、
DocumentRoot“/var/www/html”/*设置网站根目录*/
4、
5、
AddDefaultCharsetIS0-8859-1改为GB2312更改语言类型为中文标准
6、DirectoryIndexindex.htmlindex.htm修改默认首页
注:
在用vim编辑器时,使用“/+字符串”命令进行查找要进行修改的字符串
7、端口侦听listen80
Listen8080
开启虚拟主机Virtualhost后面跟上IP地址,端口号为8080
documentRoot/var/www/web2
四、
DHCP服务器
1、在安装系统时安装DHCP服务器
2、安装系统完成后,再安装DHCP服务器
a)查看有无安装:
rpm–qdh*或rpm–qLdh*
b)挂载光驱:
mount/mnt/cdrom或mount/dev/cdrom/mnt/cdrom
c)删载光驱umount/mnt/cdrom
d)安装包所在位置:
第二张盘/RedHat/RPMS/dhcp…….rpm
e)Rpm–ivhdhcp…….rpm或rpm–idhcp…….rpm
f)复制DHCP配置文件cp/usr/share/doc/dhcpd/dhcpd.conf.sample/etc/dhcpd.conf
/*模板文件:
/usr/share/doc/dhcp-3.0pl1/dhcpd.conf.sample*/
g)卸掉光驱:
umount或cd;eject
h)Dhcp服务的启动与关闭:
servicedhcpdstart/restart/stop
/etc/dhcpd.conf
ddns-update-styleinterim;
ignoreclient-updates;
subnet192.168.10.0netmask255.255.255.0{(指定DHCP分配的网段)
#---defaultgateway
optionrouters192.168.10.254;指定DHCP服务器网关地址
optionsubnet-mask255.255.255.0;子网掩码
#optionnis-domain"domain.org";
#optiondomain-name"domain.org";
optiondomain-name-servers192.168.32.1;指定DNS域名服务器IP地址
optiontime-offset-18000;#EasternStandardTime
#optionntp-servers192.168.1.1;
#optionnetbios-name-servers192.168.1.1;
#---Selectspoint-to-pointnode(defaultishybrid).Don'tchangethisunless
#--youunderstandNetbiosverywell
#optionnetbios-node-type2;
rangedynamic-bootp192.168.10.100192.168.10.200;/*指定自动获取IP的范围*/
default-lease-time21600;默认租约时间为21600秒
max-lease-time43200;最大租约时间为43200秒
#wewantthenameservertoappearatafixedaddress
hostns{
next-server;
hardwareethernet12:
34:
56:
78:
AB:
CD;
fixed-address207.175.42.254;
}
}
subnet192.168.20.0netmask255.255.255.0{
#---defaultgateway
optionrouters192.168.20.254;
optionsubnet-mask255.255.255.0;
#optionnis-domain"domain.org";
#optiondomain-name"domain.org";
optiondomain-name-servers192.168.32.1;
optiontime-offset-18000;#EasternStandardTime
#optionntp-servers192.168.1.1;
#optionnetbios-name-servers192.168.1.1;
#---Selectspoint-to-pointnode(defaultishybrid).Don'tchangethisunless
#--youunderstandNetbiosverywell
#optionnetbios-node-type2;
rangedynamic-bootp192.168.20.100192.168.20.200;
default-lease-time21600;
max-lease-time43200;
#wewantthenameservertoappearatafixedaddress
#hostns{
#next-server;
#hardwareethernet12:
34:
56:
78:
AB:
CD;
#fixed-address207.175.42.254;
#}
}
五、DNS服务器
1、启动named:
Servicenamedstart
2、
关闭named:
PS-aux显示进程列表,找到named,然后kill-9<进程号>
3、配置文件:
/etc/named.conf
options{
directory"/var/named";/*此目录中存放一些相关的配置文件*/
/*
*Ifthereisafirewallbetweenyouandnameserversyouwant
*totalkto,youmightneedtouncommentthequery-source
*directivebelow.PreviousversionsofBINDalwaysasked
*questionsusingport53,butBIND8.1usesanunprivileged
*portbydefault.
*/
//query-sourceaddress*port53;
};
//
//acachingonlynameserverconfig
//
controls{
inet127.0.0.1allow{localhost;}keys{rndckey;};
};
zone"."IN{
typehint;
file"named.ca";
};
zone""IN{/*正向域名*/
typemaster;
file".zone";/*“.zone”此文件保存在/var/named/文件夹下*/
allow-update{none;};
};
zone"0.0.127.in-addr.arpa"IN{
typemaster;
file"named.local";
allow-update{none;};
};
zone"32.168.192.in-addr.arpa"IN{/*反向域32.168.192.in-addr.arpa*/
typemaster;
file"32.168.192.local";/*”32.168.192.local”此文件保存在/var/named/文件夹下*/
allow-update{none;};
};
include"/etc/rndc.key";
4、域配置文件:
/var/named/*.zone
文本范例如下:
.zone
$TTL86400
$ORIGIN.
@1DINSOA@root(
42;serial(d.adams)
3H;refresh
15M;retry
1W;expiry
1D);minimum
1DINNS@
1DINA127.0.0.1
wwwINA192.168.32.1
ftpINA192.168.32.1
mailINA192.168.32.1
反向解析域配置文件:
/var/named/*.local
文本范例如下:
32.168.192.local
$TTL86400
@INSOA..(
1997022700;Serial
28800;Refresh
14400;Retry
3600000;Expire
86400);Minimum
INNS.
1INPTR
1INPTR
1INPTR
1INPTR
1INPTR
1INPTR.
Yy复制一行,dd删除一行,p粘贴一行
注意:
在用NSLOOKUP进行反向检测时,输入的ip地址为192.168.32.1
六、Sendmail服务器配置
(一)/etc/mail/sendmail.mc
i.注释掉42、43两行
ii.把127.0.0.1改为0.0.0.0
(二)m4sendmail.mc>sendmail.cf
(三)/etc/mail/sendmail.cf
把Cwlocalhost改为Cw域名
(四)启动servicesendmailrestart
 升级会员
升级会员 