VB语言在CAD上计算机辅助几何设计习题汇编.docx
《VB语言在CAD上计算机辅助几何设计习题汇编.docx》由会员分享,可在线阅读,更多相关《VB语言在CAD上计算机辅助几何设计习题汇编.docx(19页珍藏版)》请在冰点文库上搜索。

VB语言在CAD上计算机辅助几何设计习题汇编
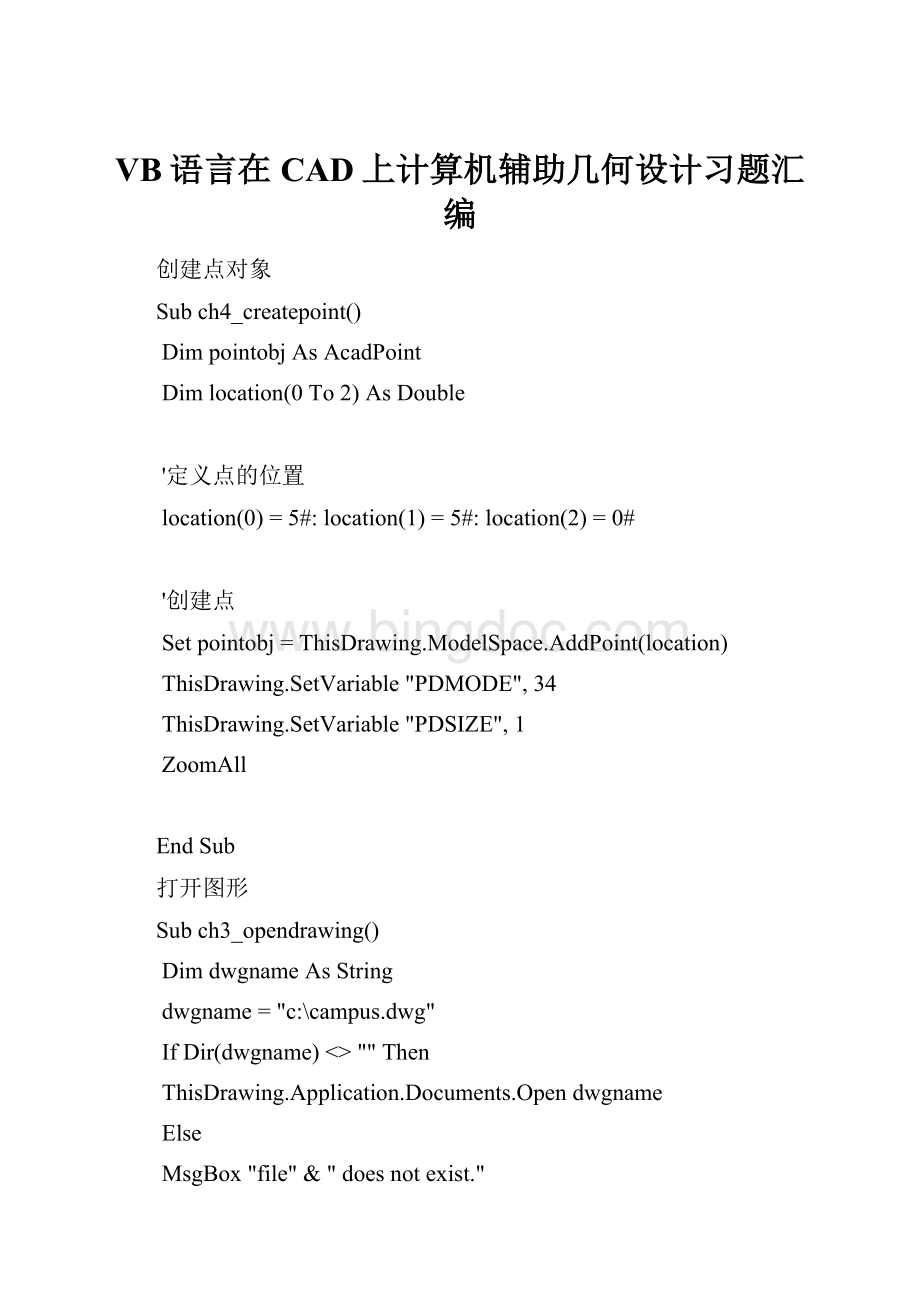
创建点对象
Subch4_createpoint()
DimpointobjAsAcadPoint
Dimlocation(0To2)AsDouble
'定义点的位置
location(0)=5#:
location
(1)=5#:
location
(2)=0#
'创建点
Setpointobj=ThisDrawing.ModelSpace.AddPoint(location)
ThisDrawing.SetVariable"PDMODE",34
ThisDrawing.SetVariable"PDSIZE",1
ZoomAll
EndSub
打开图形
Subch3_opendrawing()
DimdwgnameAsString
dwgname="c:
\campus.dwg"
IfDir(dwgname)<>""Then
ThisDrawing.Application.Documents.Opendwgname
Else
MsgBox"file"&"doesnotexist."
EndIf
EndSub
创建多段线
SubCh4_AddLightWeightPolyline()
DimplineObjAsAcadLWPolyline
Dimpoints(0To5)AsDouble
'定义二维多段线的点
points(0)=2:
points
(1)=4
points
(2)=4:
points(3)=2
points(4)=6:
points(5)=4
'在模型空间中创建一个优化多段线对象
SetplineObj=ThisDrawing.ModelSpace._
AddLightWeightPolyline(points)
ThisDrawing.Application.ZoomAll
EndSub
创建和命名图层
Subch4_newlayer()
'创建圆
DimcircleobjAsAcadCircle
Dimcenter(0To2)AsDouble
DimradiusAsDouble
center(0)=2:
center
(1)=2:
center
(2)=0
radius=1
Setcircleobj=ThisDrawing.ModelSpace._
AddCircle(center,radius)
'创建颜色对象
DimcolAsNewAcadAcCmColor
col.ColorMethod=AutoCAD.acColorMethodForeground
'设置图层的颜色
DimlaycolorAsAcadAcCmColor
Setlaycolor=AcadApplication.GetInterfaceObject("autocad.accmcolor.16")
Calllaycolor.SetRGB(122,199,25)
ThisDrawing.ActiveLayer.turecolor=laycolor
col.ColorMethod=AutoCAD.acColorMethodByLayer
'将圆的颜色指定为"随层"
'以便圆自动拾取所在图层的
'颜色
circleobj.color=acByLayer
circleobj.Update
EndSub
创建面域
SubCh4_CreateRegion()
'定义保存面域边界
'的数组
Dimcenter(0To2)AsDouble
DimradiusAsDouble
center(0)=2
center
(1)=2
center
(2)=0
radius=5#
Setcurves(0)=ThisDrawing.ModelSpace.AddCircle(center,radius)
'创建面域
DimregionObjAsVariant
regionObj=ThisDrawing.ModelSpace.AddRegion(curves)
ZoomAll
EndSub
创建曲线
SubCh4_CreateSpline()
'本例在模型空间中创建样条曲线对象。
'声明所需的变量
DimsplineObjAsAcadSpline
DimstartTan(0To2)AsDouble
DimendTan(0To2)AsDouble
DimfitPoints(0To8)AsDouble
'定义变量
startTan(0)=0.5:
startTan
(1)=0.5:
startTan
(2)=0
endTan(0)=0.5:
endTan
(1)=0.5:
endTan
(2)=0
fitPoints(0)=1:
fitPoints
(1)=1:
fitPoints
(2)=0
fitPoints(3)=5:
fitPoints(4)=5:
fitPoints(5)=0
fitPoints(6)=10:
fitPoints(7)=0:
fitPoints(8)=0
'创建样条曲线
SetsplineObj=ThisDrawing.ModelSpace.AddSpline_
(fitPoints,startTan,endTan)
ZoomAll
EndSub
创建直线
SubExample_AddLine()
'Thisexampleaddsalineinmodlespace
DimlineObjAsAcadLine
DimstartPoint(0To2)AsDouble
DimendPoint(0To2)AsDouble
'Definethestartandendpointsfortheline
startPoint(0)=1#:
startPoint
(1)=1#:
startPoint
(2)=0#
endPoint(0)=5#:
endPoint
(1)=5#:
endPoint
(2)=0#
'Createthelineinmodelspace
SetlineObj=ThisDrawing.ModelSpace.AddLine(startPoint,endPoint)
ZoomAll
EndSub
创建圆并更改颜色
Subch4_colorcircle()
DimcolorAsAcadAcCmColor
Setcolor=_
AcadApplication.GetInterfaceObject("autocad.accmcolor.16")
Callcolor.SetRGB(80,100,244)
DimcircleobjAsAcadCircle
Dimcenterpoint(0To2)AsDouble
DimradiusAsDouble
centerpoint(0)=0#:
centerpoint
(1)=0#:
centerpoint
(2)=0#
radius=5#
Setcircleobj=_
ThisDrawing.ModelSpace.addciecle(centerpoint,radius)
circleobj.turecolor=color
ZoomAll
EndSub
创建圆
Subexample_addcircle()
'本例在模型空间中创建圆对象
'声明所需的变量
DimcircleobjAsAcadCircle
Dimcenterpoint(0To2)AsDouble
DimradiusAsDouble
'定义变量
centerpoint(0)=0#:
centerpoint
(1)=0#:
centerpoint
(2)=0#
radius=5#
'创建圆对象
Setcircleobj=ThisDrawing.ModelSpace.AddCircle(centerpoint,radius)
ZoomAll
EndSub
创建组合面域
SubCh4_CreateCompositeRegion()
'创建两个圆,一个代表房间,
'另一个代表房间中的柱子
DimRoomObjects(0To1)AsAcadCircle
Dimcenter(0To2)AsDouble
DimradiusAsDouble
center(0)=4
center
(1)=4
center
(2)=0
radius=2#
SetRoomObjects(0)=ThisDrawing.ModelSpace._
AddCircle(center,radius)
radius=1#
SetRoomObjects
(1)=ThisDrawing.ModelSpace._
AddCircle(center,radius)
'从这两个圆创建一个面域
DimregionAsVariant
region=ThisDrawing.ModelSpace.AddRegion(RoomObjects)
'将面域复制到面域变量中以便使用
DimroundroomobjAsAcadRegion
DimpillarobjAsAcadRegion
Ifregion(0).Area>region
(1).AreaThen
'第一个面域是房间
Setroundroomobj=region(0)
Setpillarobj=region
(1)
Else
'第一个面域是柱子
Setpillarobj=regions(0)
Setroundroomobj=regions
(1)
EndIf
'从地板空间减去柱子空间,
'已获得表示地毯总面积的面域。
roundroomobj.BooleanacSubtraction,pillarobj
'使用Area特性确定出地毯的总面积
MsgBox"thecarpetareais:
"&roundroomobj.Area
EndSub
打开和关闭图层
Subch4_layerinvisible()
'创建圆
DimcircleobjAsAcadCircle
Dimcenter(0To2)AsDouble
DimradiusAsDouble
center(0)=2:
center
(1)=2:
center
(2)=0
radius=1
Setcircleobj=ThisDrawing.ModelSpace._
AddCircle(center,radius)
'创建图层"ABC"
DimlayerobjAsAcadLayer
Setlayerobj=ThisDrawing.Layers.Add("ABC")
'将圆指定到"ABC"图层
circleobj.Layer="ABC"
circleobj.Update
'关闭图层"ABC"
layerobj.LayerOn=False
ThisDrawing.RegenacActiveViewport
EndSub
更改对象颜色
Subch4_colorcircle()
DimcolorAsAcadAcCmColor
Setcolor=AcadApplication.GetInterfaceObject("autocad.accmcolor.16")
Callcolor.SetRGB(80,100,244)
DimcircleobjAsAcadCircle
Dimcenterpoint(0To2)AsDouble
DimradiusAsDouble
centerpoint(0)=0#:
centerpoint
(1)=0#:
centerpoint
(2)=0#
radius=5#
Setcircleobj=_
ThisDrawing.ModelSpace.AddCircle(centerpoint,radius)
circleobj.turecolor=color
ZoomAll
EndSub
加载新图形
Subch3_newdrawing()
DimdocobjAsAcadDocument
Setdocobj=ThisDrawing.Application.Documents.Add
EndSub
十字光标全屏
Subch2_prefssetcursor()
'本例将AutoCAD图形的十字光标
'设置为全屏
'访问preferences对象
DimacadprefAsAcadPreferences
Setacadpref=ThisDrawing.Application.Preferences
'使用CursorSize特性设置十字光标的大小
acadpref.Display.CursorSize=100
EndSub
保存图形
Subch3_saveactivedrawing()
'用当前名称保存活动的图形
ThisDrawing.Save
'用新名称保存活动的图形
ThisDrawing.SaveAs"mydrawing.dwg"
EndSub
使用线型
Subch4_loadlinetype()
OnErrorGoToerrorhandler
DimlinetypenameAsString
linrtypename="CENTER"
'从acad.lin文件加载"CENTER"线型
ThisDrawing.Linetypes.Loadlinetypename,"acad.lin"
ExitSub
errorhandler:
MsgBoxErr.Description
EndSub
缩放图形(多段线)
Subch4_scalepolyline()
'创建多段线
DimplineobjAsAcadLWPolyline
Dimpoints(0To11)AsDouble
points(0)=1:
points
(1)=2
points
(2)=1:
points(3)=3
points(4)=2:
points(5)=3
points(6)=3:
points(7)=3
points(8)=4:
points(9)=4
points(10)=4:
points(11)=2
Setplineobj=ThisDrawing.ModelSpace._
addlightweighpolyline(points)
plineobj.Closed=ture
ZoomAll
'定义缩放
Dimbasepoint(0To2)AsDouble
DimscalefactorAsDouble
basepoint(0)=4:
basepoint
(1)=4.25:
basepoint
(2)=0
scalefactor=0.5
'缩放多段线
plineobj.ScaleEntitybasepoint,scalefactor
plineobj.Update
EndSub
显示屏幕滚动条
Subch2_prefssetdisplay()
'本例使用DisplayScreenMenu和DisplayScrollBars特性
'分别启用屏幕菜单和禁用
'滚动条。
'访问Preferences对象
DimacadprefAsAcadPreferences
Setacadpref=ThisDrawing.Application.Preferences
'显示屏幕菜单并禁用滚动条
acadpref.Display.DisplayScreenMenu=True
acadpref.Display.DisplayScrollBars=False
EndSub
写字(科比)
Subch4_createtext()
DimtextobjAsAcadText
DimtextstringAsString
Diminsertionpoint(0To2)AsDouble
DimheightAsDouble
'创建Text对象
textstring="科比"
insertionpoint(0)=2
insertionpoint
(1)=2
insertionpoint
(2)=0
height=0.5
Settextobj=ThisDrawing.ModelSpace._
AddText(textstring,insertionpoint,height)
textobj.Update
EndSub
修改对象线型
Subch4_changecirclelinetype()
OnErrorResumeNext
'创建圆
DimcircleobjAsAcadCircle
Dimcenter(0To2)AsDouble
DimradiusAsDouble
center(0)=2:
center
(1)=2:
center
(2)=0
radius=1
Setcircleobj=ThisDrawing.ModelSpace._
AddCircle(center,radius)
DimlinetypenameAsString
linetypename="CENTER"
'从acad.lin文件加载"CENTER"线型
ThisDrawing.Linetypes.Loadlinetypename,"acad.lin"
IfErr.Description<>""ThenMsgBoxErr.Description
'指定圆的线型为"CENTER"
circleobj.Linetype="CENTER"
circleobj.Update
EndSub
旋转图形(多段线)
Subch4_rotatepolyline()
'创建多段线
DimplineobjAsAcadLWPolyline
Dimpoints(0To11)AsDouble
points(0)=1:
points
(1)=2
points
(2)=1:
points(3)=3
points(4)=2:
points(5)=3
points(6)=3:
points(7)=3
points(8)=4:
points(9)=4
points(10)=4:
points(11)=2
Setplineobj=ThisDrawing.ModelSpace._
addlightweighpolyline(points)
plineobj.Closed=ture
ZoomAll
'定义绕点(4,4.25,0)旋转
'45度
Dimbasepoint(0To2)AsDouble
DimrotationangleAsDouble
basepoint(0)=4:
basepoint
(1)=4.25:
basepoint
(2)=0
rotationangle=0.7853981'45degrees
'旋转多段线
plineobj.Rotatebasepoint,rotationangle
plineobj.Update
EndSub
阵列图形(圆)
Subch4_arrayingacircle()
'创建圆
DimcircleobjAsAcadCircle
Dimcenter(0To2)AsDouble
DimradiusAsDouble
center(0)=2#:
center
(1)=2#:
center
(2)=0#
radius=1
Setcircleobj=ThisDrawing.ModelSpace._
AddCircle(center,radius)
ZoomAll
'定义环形阵列
DimnoofobjectsAsInteger
DimangletofillAsDouble
Dimbasepnt(0To2)AsDouble
noofobjects=4
angletofill=3.14'180度
basepnt(0)=4#:
basepnt
(1)=4#:
basepnt
(2)=0#
'下例通过绕点(3,3,0)旋转和
'复制对象而创建四个
'对象副本
DimretobjAsVariant
retobj=circleobj.ArrayPolar_
(noofobjects,angletofill,basepnt)
ZoomAll
EndSub
偏移图形(多段线)
Subch4_offpolyline()
'创建多段线
DimplineobjAsAcadLWPolyline
Dimpoint(0To11)AsDouble
points(0)=1:
points
(1)=1
points
(2)=1:
points(3)=2
points(4)=2:
points(5)=2
points(6)=3:
points(7)=2
point