Qt自定义窗口部件.docx
《Qt自定义窗口部件.docx》由会员分享,可在线阅读,更多相关《Qt自定义窗口部件.docx(14页珍藏版)》请在冰点文库上搜索。
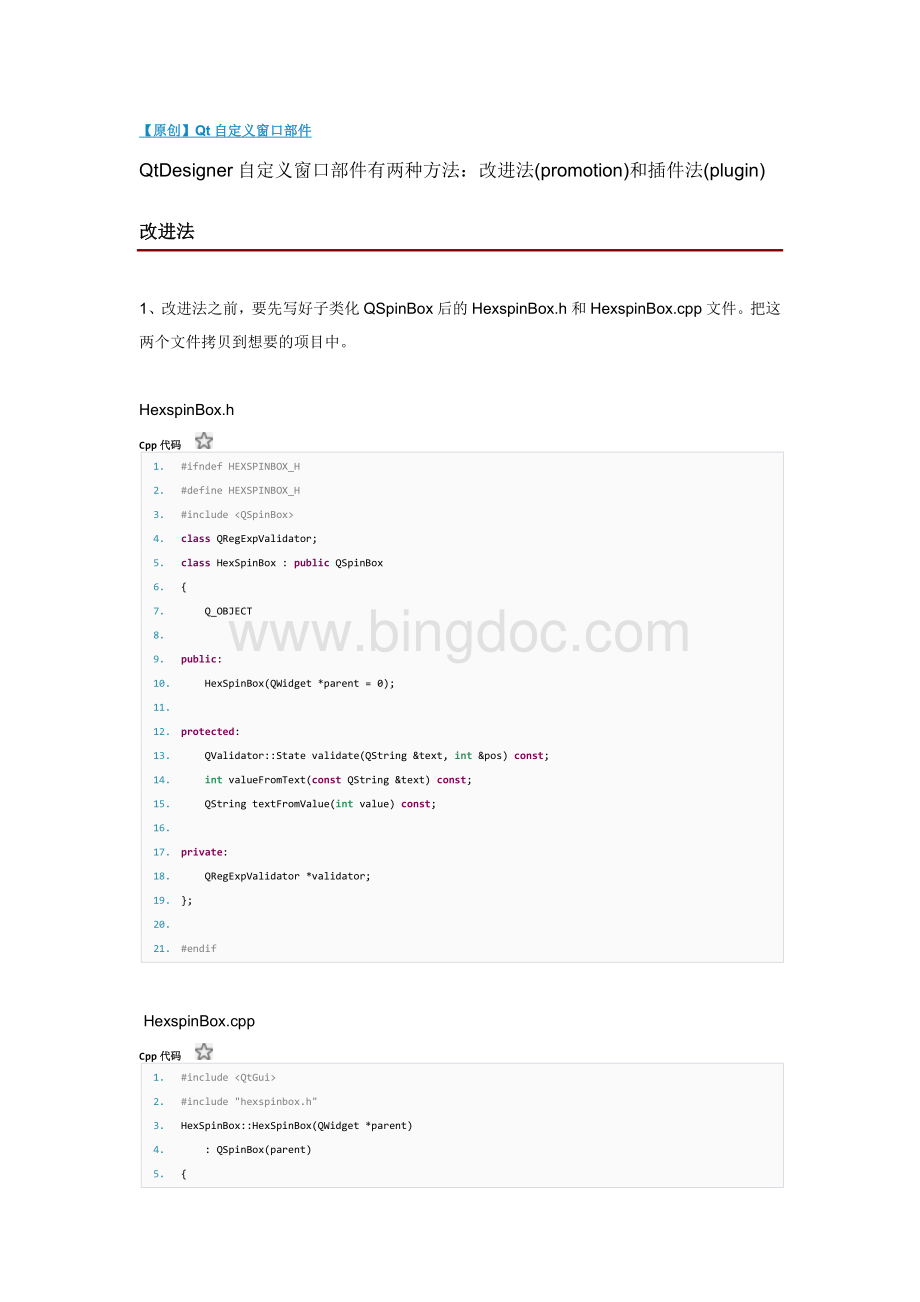
【原创】Qt自定义窗口部件
QtDesigner自定义窗口部件有两种方法:
改进法(promotion)和插件法(plugin)
改进法
1、改进法之前,要先写好子类化QSpinBox后的HexspinBox.h和HexspinBox.cpp文件。
把这两个文件拷贝到想要的项目中。
HexspinBox.h
Cpp代码
1.#ifndef HEXSPINBOX_H
2.#define HEXSPINBOX_H
3.#include
4.class QRegExpValidator;
5.class HexSpinBox :
public QSpinBox
6.{
7. Q_OBJECT
8.
9.public:
10. HexSpinBox(QWidget *parent = 0);
11.
12.protected:
13. QValidator:
:
State validate(QString &text, int &pos) const;
14. int valueFromText(const QString &text) const;
15. QString textFromValue(int value) const;
16.
17.private:
18. QRegExpValidator *validator;
19.};
20.
21.#endif
HexspinBox.cpp
Cpp代码
1.#include
2.#include "hexspinbox.h"
3.HexSpinBox:
:
HexSpinBox(QWidget *parent)
4. :
QSpinBox(parent)
5.{
6. setRange(0, 255);
7. validator = new QRegExpValidator(QRegExp("[0-9A-Fa-f]{1,8}"), this);
8.}
9.
10.QValidator:
:
State HexSpinBox:
:
validate(QString &text, int &pos) const
11.{
12. return validator->validate(text, pos);
13.}
14.
15.int HexSpinBox:
:
valueFromText(const QString &text) const
16.{
17. bool ok;
18. return text.toInt(&ok, 16);
19.}
20.
21.QString HexSpinBox:
:
textFromValue(int value) const
22.{
23. return QString:
:
number(value, 16).toUpper();
24.}
2、在需要开发的项目中的窗口中,
1、用QtDesigner创建一个新的窗体main.ui,把控件箱里的QSpinBox添加到窗体中。
2、右击微调框,选择“Promoteto”上下文菜单。
3、在弹出的对话框中,类名处填写“HexSpinBox”,头文件填写“hexspinbox.h”
好了。
在ui生成的包含有QSpinBox的控件文件中,ui的源代码里面多了一段
HSpinBox
QSpinBox
包含文件变为"hexspinbox.h"。
在QtDesigner中,QSpinBox表示的控件为HexSpinBox,并且可以设置所有的QSpinBox的属性。
可以在VS2008中编译一下main.ui文件,从ui_main.h源代码中可以知道,引入的控件是:
Cpp代码
1.#include
2.#include
3.#include
4.#include "hspinbox.h"
5.
6.QT_BEGIN_NAMESPACE
7.
8.class Ui_QMainClass
9.{
10.public:
11. QWidget *centralWidget;
12. QPushButton *pushButton;
13. QTableWidget *tableWidget;
14. QSpinBox *spinBox;
15. HSpinBox *hspinBox;
升级法的缺点是不能在QtDesigner中设置自定义控件自己的特有属性,也不能够绘制自己。
这些问题可以用插件法解决。
插件法
1.VS中创建Qt4DesignPlugin工程,名称叫custom
自动建立如下几个文件:
自定义控件:
custom.h,custom.cpp
插件:
customplugin.h,customplugin.cpp
源代码如下:
custom.h
Cpp代码
1.#ifndef CUSTOM_H
2.#define CUSTOM_H
3.#include
4.#include "ui_test.h"
5.class custom :
public QWidget
6.{
7. Q_OBJECT
8.public:
9. custom(QWidget *parent = 0);
10. ~custom();
11.private:
12. Ui:
:
Form ui;
13.};
14.
15.#endif // CUSTOM_H
custom.cpp
Cpp代码
1.#include "custom.h"
2.
3.custom:
:
custom(QWidget *parent)
4. :
QWidget(parent)
5.{
6. ui.setupUi(this);
7.}
8.
9.custom:
:
~custom()
10.{
11.
12.}
customplugin.h
Cpp代码
1.#ifndef CUSTOMPLUGIN_H
2.#define CUSTOMPLUGIN_H
3.
4.#include
5.
6.class customPlugin :
public QObject, public QDesignerCustomWidgetInterface
7.{
8. Q_OBJECT
9. Q_INTERFACES(QDesignerCustomWidgetInterface)
10.
11.public:
12. customPlugin(QObject *parent = 0);
13.
14. bool isContainer() const;
15. bool isInitialized() const;
16. QIcon icon() const;
17. QString domXml() const;
18. QString group() const;
19. QString includeFile() const;
20. QString name() const;
21. QString toolTip() const;
22. QString whatsThis() const;
23. QWidget *createWidget(QWidget *parent);
24. void initialize(QDesignerFormEditorInterface *core);
25.
26.private:
27. bool initialized;
28.};
29.
30.#endif // CUSTOMPLUGIN_H
customplugin.cpp
Cpp代码
1.#include "custom.h"
2.#include
3.#include "customplugin.h"
4.customPlugin:
:
customPlugin(QObject *parent)
5. :
QObject(parent)
6.{
7. initialized = false;
8.}
9.
10.void customPlugin:
:
initialize(QDesignerFormEditorInterface */*core*/)
11.{
12. if (initialized)
13. return;
14. initialized = true;
15.}
16.
17.bool customPlugin:
:
isInitialized() const
18.{
19. return initialized;
20.}
21.
22.QWidget *customPlugin:
:
createWidget(QWidget *parent)
23.{
24. return new custom(parent);
25.}
26.
27.QString customPlugin:
:
name() const
28.{
29. return "custom";
30.}
31.
32.QString customPlugin:
:
group() const
33.{
34. return "My Plugins";
35.}
36.
37.QIcon customPlugin:
:
icon() const
38.{
39. return QIcon();
40.}
41.
42.QString customPlugin:
:
toolTip() const
43.{
44. return QString();
45.}
46.
47.QString customPlugin:
:
whatsThis() const
48.{
49. return QString();
50.}
51.
52.bool customPlugin:
:
isContainer() const
53.{
54. return false;
55.}
56.
57.QString customPlugin:
:
domXml() const
58.{
59. return "\n"
60. " \n"
61. " \n"
62. " 0\n"
63. " 0\n"
64. " 100\n"
65. " 100\n"
66. " \n"
67. " \n"
68. "\n";
69.}
70.
71.QString customPlugin:
:
includeFile() const
72.{
73. return "custom.h";
74.}
75.
76.Q_EXPORT_PLUGIN2(custom, customPlugin)
在其cpp的最后必须添加下面的宏:
·········10········20········30········40········50········60········70········80········90········100·······110·······120·······130·······140·······150
1.Q_EXPORT_PLUGIN2(customWidgetPlugin, CustomWidgetPlugin) // 第一个参数为插件的名字,第二个是插件类的名字(而不是自定义控件的类名)
2. 新建后,直接编译,会产生如下错误
1>LINK:
fatalerrorLNK1181:
cannotopeninputfile'QtDesignerd.lib'
这是因为此工程默认引用的是QtDesignerd.lib库,更改其为版本对应的库即可消除故障(VS2008是在项目的属性中Linker/input/AdditionalDependencies中修改,我这里Debug配置使用的是QtDesignerd4.lib,Release版本使用QtDesigner4.lib)。
3、使用自定义插件
1)、只需要把通过Release模式生成的 项目.lib和项目.dll文件拷到C:
\Qt\4.7.4\plugins\designer中,
2)、然后在QtDesigner中,选择菜单Help/AboutPlugin就可以看到你的自定义控件是否已经载入成功。
在QtDesigner中控件列表中有一项MyWidget中就有你的自定义控件。
参考:
1、 Qt自定义控件(插件)并添加到QtDesigher
打开QtDesigner,我们自定义的空间custom成功使用界面如下:
Qt自定义控件(插件)并添加到QtDesigher
2010-01-1908:
56 7376人阅读 评论(0) 收藏 举报
qtmakefilewindows平台dll编译器
之前使用Qt的时候都是手写代码的(因为批量按钮可以使用数组实现),但当界面越来越复杂时,这种开发效率就太低了;
后来就开始使用QtDesigner,但要使QtDesigner支持我自己写的控件,需要提升或插件的形式(在中有介绍).
结果看了之后,觉得提升的方式简单而不灵活,故使用插件法实现;步骤如下:
[具体可参照第三方开源组件Qwt部件库的插件类的实现方式,个人感觉特别规范]
1.继承QObject和QDesignerCustomWidgetInterface实现插件类(或继承QObject和QDesignerCustomWidgetCollectionInterface实现多个自定义控件);
2.编写Qt平台无关的工程文件.pro(例如CustomWidgetPlugin.pro);
3.qmake CustomWidgetPlugin.pro;
4.make(windows下vc平台使用nmake,如果发现缺少环境变量,可以运行其bin/vcvars32.bat配置环境)
先说说第一点:
继承后需要重写父类虚函数,原型如下:
[cpp] viewplaincopy
1.#include
2.#include
3.class CustomWidgetPlugin:
public QObject, public QDesignerCustomWidgetInterface
4.{
5. Q_OBJECT // 必须
6. Q_INTERFACES(QDesignerCustomWidgetInterface) // 必须
7.public:
8. CustomWidgetPlugin(QObject *parent = 0); // 构造函数,一般使其调用父类QObject的构造函数即可
9. QString name() const; // 返回由该插件提供的窗口控件的名字
10. QString includeFile() const; // 返回由该插件封装的特定窗口控件的头文件的名称. 这个头文件会包含在由uic生成的代码中
11. QString group() const; // 返回自定义的窗口控件所属于的在QtDesigner里的组名, 如果QtDesigner没有则会自动创建
12. QIcon icon() const; // 自定义控件在QtDesigner的图标
13. QString toolTip() const; // 控件的"提示"
14. QString whatsThis() const; // 控件的"这是什么"
15. bool isContainer() const; // 控件是否包含其他控件,如果有则返回true,否则返回false
16. QWidget *createWidget(QWidget *parent); // QtDesigner会调用这个函数创建自定义控件,返回创建的(C++中可能是new)自定义控件即可
17.};
在其cpp的最后必须添加下面的宏:
[cpp] viewplaincopy
1.Q_EXPORT_PLUGIN2(customWidgetPlugin, CustomWidgetPlugin) // 第一个参数为插件的名字,第二个是插件类的名字(而不是自定义控件的类名)
再说说第二点:
.pro的参数和语法比较多,在网上可以搜到不少资料,在这里总结一下
1. 注释
从“#”开始,到这一行结束。
2. 指定源文件
SOURCES=*.cpp
对于多源文件,可用空格分开,如:
SOURCES=1.cpp2.cpp3.cpp
或者每一个文件可以被列在一个分开的行里面,通过反斜线另起一行,就像这样:
SOURCES=hello.cpp /(续行符)
main.cpp
一个更冗长的方法是单独地列出每一个文件,就像这样:
SOURCES+=hello.cpp
SOURCES+=main.cpp
这种方法中使用“+=”比“=”更安全,因为它只是向已有的列表中添加新的文件,而不是替换整个列表。
3. 指定头文件
HEADERS=hello.h或者HEADERS+=hello.h
列出源文件的任何一个方法对头文件也都适用。
4. 配置信息
CONFIG用来告诉qmake关于应用程序的配置信息。
CONFIG+=qtwarn_onrelease
编译QtDesigner插件中使用CONFIG+= desginerplugin release
在这里使用“+=”,是因为我们添加我们的配置选项到任何一个已经存在中。
这样做比使用“=”那样替换已经指定的所有选项是更安全的。
A> qt部分告诉qmake这个应用程序是使用Qt来连编的。
这也就是说qmake在连接和为编译添加所需的包含路径的时候会考虑到Qt库的。
B> warn_on部分告诉qmake要把编译器设置为输出警告信息的。
C> release部分告诉qmake应用程序必须被连编为一个发布的应用程序。
在开发过程中,程序员也可以使用debug来替换release
5. 指定目标文件名
TARGET=filename
如果不设置该项目,目标名会被自动设置为跟项目文件一样的名称
6. 添加界面文件(ui )
INTERFACES=filename.ui
7. 平台相关性处理
我们在这里需要做的是根据qmake所运行的平台来使用相应的作用域来进行处理。
为Windows平台添加的依赖平台的文件的简单的作用域看起来就像这样:
win32{
SOURCES+=hello_win.cpp
}
所以如果qmake运行在Windows上的时候,它就会把hello_win.cpp添加到源文件列表中。
如果qmake运行在其它平台上的时候,它会很简单地把这部分忽略。
8. 如果一个文件不存在,停止qmake
如果某一个文件不存在的时候,你也许不想生成一个Makefile。
我们可以通过使用exists()函数来检查一个文件是否存在。
我们可以通过使用error()函数把正在运行的qmake停下来。
这和作用域的工作方式一样。
只要很简单地用这个函数来替换作用域条件。
对main.cpp文件的检查就像这样:
!
exists(main.cpp){
error("Nomain.cppfilefound")
}
“!
”用来否定这个测试,比如,如果文件存在,exists(main.cpp)是真,如果文件不存在,!
exists(main.
 升级会员
升级会员 