利用WCF创建简单的RESTFul Service.docx
《利用WCF创建简单的RESTFul Service.docx》由会员分享,可在线阅读,更多相关《利用WCF创建简单的RESTFul Service.docx(16页珍藏版)》请在冰点文库上搜索。
利用WCF创建简单的RESTFulService
利用WCF创建简单的RESTFulService
***服务端程序见WCFcompany
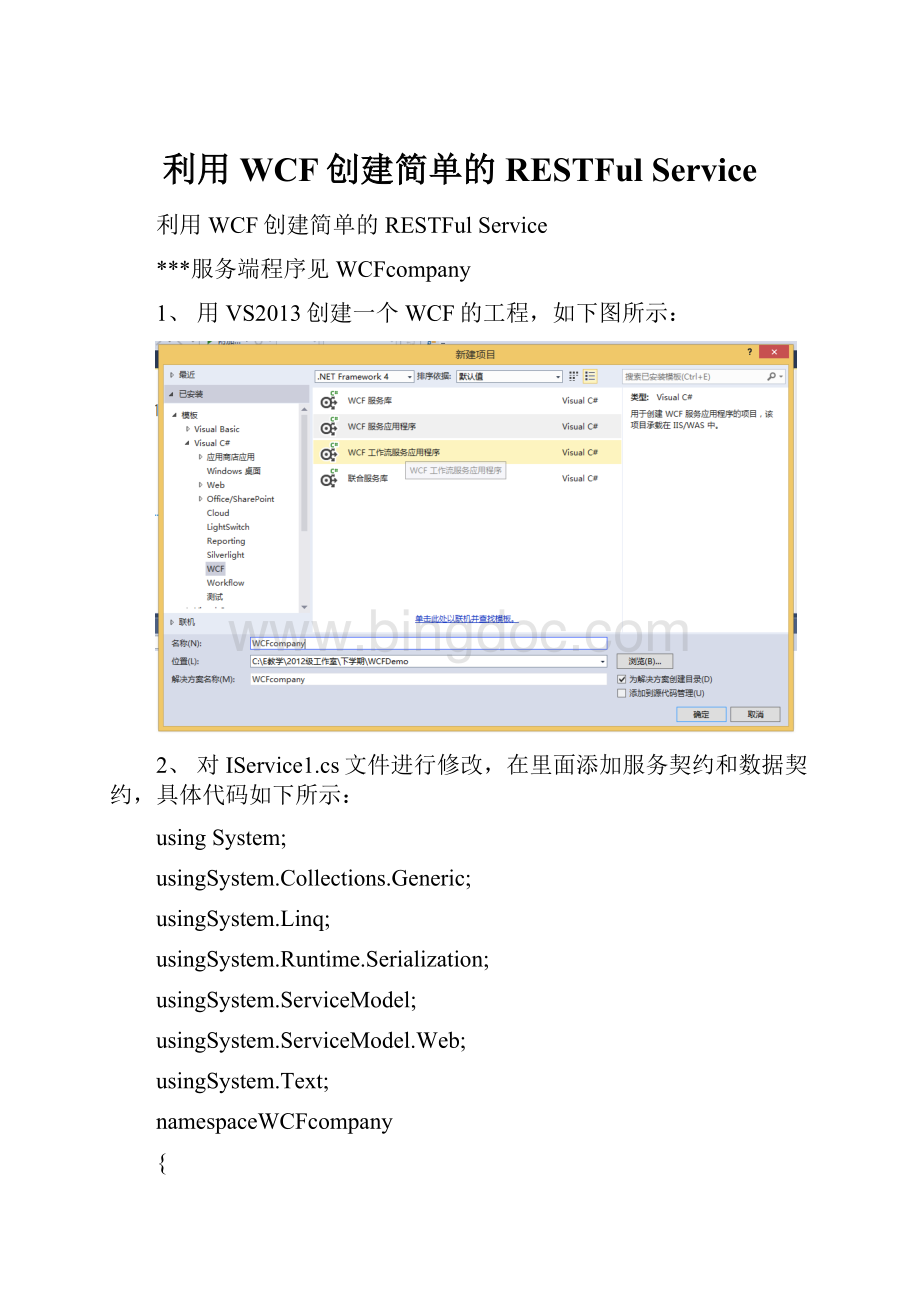
1、用VS2013创建一个WCF的工程,如下图所示:
2、对IService1.cs文件进行修改,在里面添加服务契约和数据契约,具体代码如下所示:
usingSystem;
usingSystem.Collections.Generic;
usingSystem.Linq;
usingSystem.Runtime.Serialization;
usingSystem.ServiceModel;
usingSystem.ServiceModel.Web;
usingSystem.Text;
namespaceWCFcompany
{
//注意:
使用“重构”菜单上的“重命名”命令,可以同时更改代码和配置文件中的接口名“IService1”。
//定义服务契约
[ServiceContract]
publicinterfaceIService1
{
//TODO:
在此添加您的服务操作
[OperationContract]
[WebGet(UriTemplate="getcustomer/{id}",RequestFormat=WebMessageFormat.Json,ResponseFormat=WebMessageFormat.Json)]
CustomerGetCustomerById(stringid);
[OperationContract]
[WebGet(UriTemplate="getallcustomer",RequestFormat=WebMessageFormat.Json,ResponseFormat=WebMessageFormat.Json)]
ListGetAllCustomer();
[OperationContract]
[WebInvoke(Method="POST",UriTemplate="addcustomer",RequestFormat=WebMessageFormat.Json,ResponseFormat=WebMessageFormat.Json)]
boolAddCustomer(Customercust);
[OperationContract]
//如果有多个参数要使用BodyStyle=WebMessageBodyStyle.Wrapped
//[WebInvoke(Method="PUT",UriTemplate="updatecustomer",RequestFormat=WebMessageFormat.Json,ResponseFormat=WebMessageFormat.Json,BodyStyle=WebMessageBodyStyle.Wrapped)]
[WebInvoke(Method="PUT",UriTemplate="updatecustomer",RequestFormat=WebMessageFormat.Json,ResponseFormat=WebMessageFormat.Json)]
boolUpdateCustomer(Customercust);
[OperationContract]
[WebInvoke(Method="DELETE",UriTemplate="deletecustomer/{id}",RequestFormat=WebMessageFormat.Json,ResponseFormat=WebMessageFormat.Json)]
boolDeleteCustomer(stringid);
}
//使用下面示例中说明的数据约定将复合类型添加到服务操作。
//定义数据契约
[DataContract]
publicclassCustomer
{
[DataMember]
publicstringCust_id{get;set;}
[DataMember]
publicstringCust_name{get;set;}
[DataMember]
publicstringAddr{get;set;}
[DataMember]
publicstringTel_no{get;set;}
[DataMember]
publicstringZip{get;set;}
}
}
注意:
(1)WCFREST中通过[WebGet]、[WebInvoke]特性很好的利用了HTTP的GET/POST/PUT/DELETE方式,绑定到服务的不同方法上。
比如GET方法不用客户端提供太多数据,正适合查询只提供主键或者查询字段的场景。
POST则适合数据的插入,PUT则应用在数据更新,DELETE则直接用在数据删除上。
(2)当请求为Get时 一般用来查询数据,使用[WebGet] ;而增加、修改、删除时,则使用[WebInvoke],并用Method来决定使用POST、PUT或DELETE,这几个单词一定要大写,否则会出现“ HTTP 错误 405 405 不允许此方法对于请求所标识的资源,不允许使用请求行中所指定的方法”。
(3)通过UriTemplate 定义REST的服务的调用方式,UriTemplet描述了URL匹配的格式,当格式匹配时,{id}位置的字符串会被对应传入为方法参数。
当请求服务时,通过RequestFormat与ResponseFormat来指定请求和返回的数据格式,可选项为JSON和XML。
3、在Service1.svc.cs文件中实现IService1接口,代码如下:
usingSystem;
usingSystem.Collections.Generic;
usingSystem.Linq;
usingSystem.Runtime.Serialization;
usingSystem.ServiceModel;
usingSystem.ServiceModel.Activation;
usingSystem.ServiceModel.Web;
usingSystem.Text;
usingSystem.Data;
usingSystem.Data.SqlClient;
usingSqlServerDAL;
namespaceWCFcompany
{
//以下两个特性是一定要加上去的,否则报错
[AspNetCompatibilityRequirements(RequirementsMode=AspNetCompatibilityRequirementsMode.Allowed)]
[ServiceBehavior(InstanceContextMode=InstanceContextMode.PerCall)]
publicclassService1:
IService1
{
privateDataTableSqlConnHelpGetDataMethod(stringsql)
{
CnnHelper.ConnectionSql();
CnnHelper.IsOpenHelp();
CnnHelper.UseCommand(sql,CommandType.Text);
DataTabledt=CnnHelper.UseSqlDataReader();
returndt;
}
privateintSqlConnHelpSetDataMethod(stringsql)
{
CnnHelper.ConnectionSql();
CnnHelper.IsOpenHelp();
CnnHelper.UseCommand(sql,CommandType.Text);
returnCnnHelper.UseExecuteNonQuery();
}
publicCustomerGetCustomerById(stringid)
{
stringsql="select*fromcustomerwherecust_id='"+id+"'";
Customercust=newCustomer();
DataTabledt=SqlConnHelpGetDataMethod(sql);
if(dt!
=null&&dt.Rows.Count==1)
{
cust.Cust_id=dt.Rows[0][0].ToString();
cust.Cust_name=dt.Rows[0][1].ToString();
cust.Addr=dt.Rows[0][2].ToString();
cust.Tel_no=dt.Rows[0][3].ToString();
cust.Zip=dt.Rows[0][4].ToString();
}
elsecust=null;
returncust;
}
publicListGetAllCustomer()
{
ListcustList=newList();
stringsql="select*fromcustomer";
DataTabledt=SqlConnHelpGetDataMethod(sql);
if(dt!
=null&&dt.Rows.Count!
=0)
{
for(inti=0;i{
Customercust=newCustomer();
cust.Cust_id=dt.Rows[i][0].ToString();
cust.Cust_name=dt.Rows[i][1].ToString();
cust.Addr=dt.Rows[i][2].ToString();
cust.Tel_no=dt.Rows[i][3].ToString();
cust.Zip=dt.Rows[i][4].ToString();
custList.Add(cust);
}
}
elsecustList=null;
returncustList;
}
publicboolAddCustomer(Customercust)
{
stringsql="insertintocustomervalues('"+cust.Cust_id+"','"+cust.Cust_name+"','"+cust.Addr+"','"+cust.Tel_no+"','"+cust.Zip+"')";
boolflag=false;
if(SqlConnHelpSetDataMethod(sql)==1)
{
flag=true;
}
returnflag;
}
publicboolUpdateCustomer(Customercust)
{
stringsql="updatecustomersetcust_name='"+cust.Cust_name+"',addr='"+cust.Addr+"',tel_no='"+cust.Tel_no+"',zip='"+cust.Zip+"'wherecust_id='"+cust.Cust_id+"'";
boolflag=false;
if(SqlConnHelpSetDataMethod(sql)==1)
{
flag=true;
}
returnflag;
}
publicboolDeleteCustomer(stringid)
{
stringsql="deletecustomerwherecust_id='"+id+"'";
boolflag=false;
if(SqlConnHelpSetDataMethod(sql)==1)
{
flag=true;
}
returnflag;
}
}
}
4、修改Web.config文件,在文件中添加如下代码:
(添加服务器节点,并以REST行为进行配置,注意服务器名必须是:
WCFcompany.Service1,相应的服务契约是WCFcompany.IService1)
binding="webHttpBinding"
contract="WCFcompany.IService1"
behaviorConfiguration="ESEndPointBehavior"/>
--Toavoiddisclosingmetadatainformation,setthevaluesbelowtofalsebeforedeployment-->
--Toreceiveexceptiondetailsinfaultsfordebuggingpurposes,setthevaluebelowtotrue.Settofalsebeforedeploymenttoavoiddisclosingexceptioninformation-->
5、如果要在IIS中能访问数据库,必须采用SQLServer身份验证方式连接数据库。
(1)确保你的SqlServer能够以sa身份连接数据库。
右击SQLServer服务器,选“属性”,在服务器属性窗口的“安全性”选项页中选择“SQLServer和Windows身份验证”,重启服务。
(2)设置sa的登录密码。
在SQLServer服务器的“安全性”—>“登录名”—>“sa”,右击,选择“属性”,设置sa的密码,如“123”。
(3)启用sa,在SQLServer服务器的“安全性”—>“登录名”—>“sa”,右击,选择“属性”,在“状态”选择页中,登录选择“启用”,是否允许连接到数据库引擎,选择“授予”,点击确定就可以了。
(4)在Web.config文件中添加如下代码(以sa身份连接数据库):
--设置连接字符串-->
6、启动IIS,并开启IIS支持WCF功能
(1)启动IIS,勾选上IIS信息服务->万维网服务->应用程序开发功能中“.net扩展”和“ASP.NET”相关的选项,如下图所示:
(2)另外,IIS如果要支持WCF的话,还需勾选上:
.NETFramework4.5高级服务->WCF服务中的“HTTP激活”和“TCP端口共享”
(3)注意还要勾选上万维网服务—>常见HTTP功能下的有关选项,见下图:
7、在IIS信息服务器中,布署网站。
(1)添加网站,(注意,应用程序池选择4.0),可以自行选择一个端口号,见下图:
(2)布署之后,在浏览器中输入http:
//localhost:
8034/Service1.svc,出现如下界面,说明服务成功创建。
(3)在浏览器中输入:
http:
//localhost:
8034/Service1.svc/getcustomer/c0001,执行按客户号查询客户,结果如下:
大家可以看到返回Json格式的数据。
***服务端程序见WCFcompany
创建WP客户端访问RESTFulService中的服务
***WP端程序见CompanyWP
常见问题:
1、在使用模拟器运行WP客户端时,如果内存不够时,会出现如下界面:
2、GET数据时遇到的问题:
当GET完数据之后,我们向服务端POST了数据,用相同的Uri再次GET数据时,数据没有更新,这是GET操作缓存数据所致,解决方案:
GET请求URL后加随机数(如系统时间),让服务器认为不是相同的请求。
stringt=DateTime.Now.Second.ToString();
Uriuri=newUri("http:
//localhost:
8034/Service1.svc/getallcustomer?
t="+t);
 升级会员
升级会员 