ubutu使用技巧.docx
《ubutu使用技巧.docx》由会员分享,可在线阅读,更多相关《ubutu使用技巧.docx(26页珍藏版)》请在冰点文库上搜索。

ubutu使用技巧
ubuntu使用技巧
maxelephant@2007-01-2322:
49
1.使用新的vi和bash
------------------------------------------
#ln-sf/usr/bin/vim/usr/bin/vi
#ln-sf/bin/bash/bin/sh
注:
ubuntu-6.10预设用/bin/sh链接到/bin/dash,会造成一些shellscript执行错误,所以将/bin/sh链接到/bin/bash
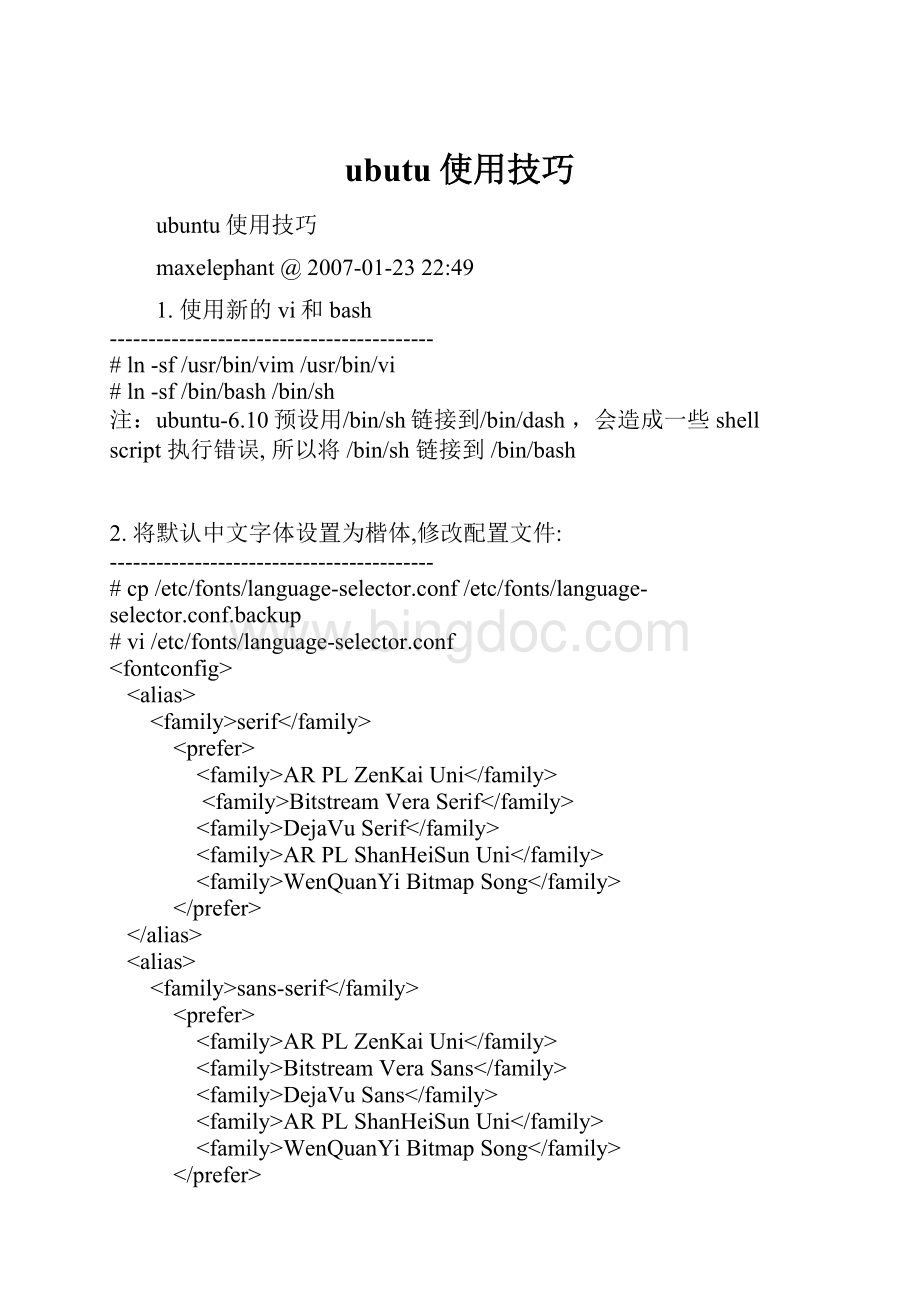
2.将默认中文字体设置为楷体,修改配置文件:
------------------------------------------
#cp/etc/fonts/language-selector.conf/etc/fonts/language-selector.conf.backup
#vi/etc/fonts/language-selector.conf
serif
ARPLZenKaiUni
BitstreamVeraSerif
DejaVuSerif
ARPLShanHeiSunUni
WenQuanYiBitmapSong
sans-serif
ARPLZenKaiUni
BitstreamVeraSans
DejaVuSans
ARPLShanHeiSunUni
WenQuanYiBitmapSong
monospace
ARPLZenKaiUni
BitstreamVeraSansMono
DejaVuSansMono
ARPLShanHeiSunUni
WenQuanYiBitmapSong
"系统"--"首选项"--"字体":
------------------------------------------
应用程序字体:
NimbusMonoL10(其它字体相同)
"细节...":
分辨率:
110
次像素(选中)
3.ubuntu6.10源:
--------------------------------------------
#vi/etc/apt/sources.list
debedgymainrestricteduniversemultiverse
debedgy-securitymainrestricteduniversemultiverse
debedgy-updatesmainrestricteduniversemultiverse
debedgy-proposedmainrestricteduniversemultiverse
debedgy-backportsmainrestricteduniversemultiverse
deb-srcedgymainrestricteduniversemultiverse
deb-srcedgy-securitymainrestricteduniversemultiverse
deb-srcedgy-updatesmainrestricteduniversemultiverse
deb-srcedgy-proposedmainrestricteduniversemultiverse
deb-srcedgy-backportsmainrestricteduniversemultiverse
debedgymainrestricteduniversemultiverse
#apt-getupdate
4.installVIM
------------------------------------------
#apt-getinstallvim
BydefaulttheVIMinstalledwithubuntu6.10isvim-tiny,whichhadnosyntaxhighlightingwhatsoever,notgoodforme.
5.installkate
------------------------------------------
#apt-getinstallkate
$ln-s/usr/bin/kwrite
注:
由于ubuntu-6.10的gedit有bug所以需要安装文本编辑器kate
配置kwirte:
"Settings"-->"ConfigureEditor"-->
(1)"Fonts&Colors"
(2)"Editing"-->"Tabwidth4"
注:
tabulator ['t?
bjuleit?
]制表键
6.installscim
--------------------------------------------
apt-getinstallscim-pinyinscim-modules-tablescim-tables-zh
输入法配置:
(1)
vi/etc/gdm/Xsession:
在PROGNAME=Xsession的行后面添加一行
exportXMODIFIERS=@im=SCIM
在GDM_LANG所在的字段的后面(if——fi段的后面)添加一行
/usr/bin/scim&
(2)
“系统”--“首选项”--"SCIM输入法设置":
"输入法引擎"--"全局设置"
“英文/键盘”(选中)
“中文(简体)”--“智能拼音”(选中)
"面板"--“GTK”
"显示属性标签"(去掉)
8.安装StarDict:
------------------------------------------
(1)目前源里的中文字典还不全,先安装主程序:
#apt-getinstallstardictstardict-common
#apt-getinstallstardict-cdict-gbstardict-cedict-gbstardict-hanzimstardict-langdao-ce-gbstardict-langdao-ec-gbstardict-oxford-gbstardict-xdict-ce-gbstardict-xdict-ec-gb
注:
安装后需要重新起动
9.安装浏览器Flash插件:
(可能会引起firefox崩溃)
------------------------------------------
sudomkdir-p/usr/lib/X11/fonts/Type1
sudoapt-getinstallflashplugin-nonfree(耐心等待)
10.安装中文语言支持:
(可能会引起firefox崩溃)
------------------------------------------
如果你在安装过程中没有联网,你的系统主菜单、Firefox等也许都是英文,所以你就有必要在安装中文支持:
#apt-getinstalllanguage-support-zh
11.关掉IPV6:
(给firefox提速)
------------------------------------------
#sed-i's/net-pf-10\ipv6/net-pf-10\off/g'/etc/modprobe.d/aliases
12.PDF格式浏览器evince浏览中文PDF文件:
------------------------------------------
#apt-getinstallxpdf-chinese-simplified
#apt-getinstallxpdf-chinese-traditional
13.关闭系统更新通知:
------------------------------------------
"系统"-->"首选项"-->"会话"-->"系统程序"-->"update-notifier"(禁用)
14.使用mplayer看高清晰电影(aviwmvrmrmvb)
------------------------------------------
#apt-getinstallmplayermplayer-fontsmplayer-skinsmozilla-mplayer
#apt-getinstallw32codecs
问题:
Fatalerror!
Erroropening/initializingtheselectedvideo_out(-vo)device
答案:
"Perferences"--"Vedio"--"x11X11(XImage/Shm)"
15.安装Java环境:
------------------------------------------
(1)建议安装JDK,反正也不比JRE多用很多空间
#apt-getinstallsun-java5-jdk(为QQ安装)
(2)配置JRE:
和Dapper不同,默认安装的Sun-Java环境已经将自己设置成为默认的JRE了,所以你就不需要自己设置了。
如果不放心,可以使用以下命令查看和设置JRE:
sudoupdate-alternatives--configjava
选择:
/usr/lib/jvm/java-1.5.0-sun/jre/bin/java作为你的JRE
(3)安装浏览器Java插件:
#apt-getinstallsun-java5-plugin(用firefox看地图)
16.笔记本长时间合上液晶屏就会死机:
------------------------------------------
关掉屏幕保护程序:
系统-->首选项-->屏幕保护程序
17.没有网络环境,启动带有ADSL拨号的ubuntu非常慢:
------------------------------------------
关闭pppd-nds(sysv-rc-conf):
S[X]
删除ADSL链接:
#rm/etc/ppp/peers/dsl-provider
18.mpg123无法播放mp3:
Can'topendefaultsounddevice!
------------------------------------------
(1)与alsa-oss有关,如果安装配置过alsa,将其删除:
#apt-getautoremovealsa-oss
#rm/etc/asound.conf
(2)修改配置文件:
vi/etc/esound/esd.conf
-as1-->-as2-ddefault
19.删除、清除软件:
------------------------------------------
彻底删除软件(卸载软件和软件包):
apt-getautoremovealsa-oss
卸载软件:
apt-getremovealsa-oss
清除下载到本地的软件包:
apt-getclean
自动清理下载的软件包文件,只清除无法下载的软件包:
apt-getautoclean
20.支持NTFS写入
------------------------------------------
通过第三方软件支持写入ntfs
#apt-getinstallfuse-utilslibfuse2
#apt-getinstallntfs-3g
手动挂载ntfs
#umount/media/hda1
#ntfs-3g/dev/hda1/media/hda1
开机自动载入ntfs
#vi/etc/fstab
/dev/hda1/media/vistantfs-3gsilent,umask=0,locale=zh_TW.utf800
21.突然ubuntu没有声音了!
------------------------------------------
#alsamixer
调整项(将主控音量调大)
alsaAdvancedLinuxSoundArchitecture
mixer[miks?
]
调音技术员;混频器
22.局部抓图
------------------------------------------
如果你是kde的话,用ksnapshot是可以的
如果是gnome的话,需要使用imagemagick
#sudoapt-getinstallimagemagick
Ubuntu使用技巧(全)----本人在网上找的
2008-03-1413:
54
查看软件xxx安装内容
∙dpkg-Lxxx
查找软件
∙apt-cachesearch正则表达式
查找文件属于哪个包
∙dpkg-Sfilename
apt-filesearchfilename_d(_z1RU9EV0
查询软件xxx依赖哪些包
∙apt-cachedependsxxx
查询软件xxx被哪些包依赖
∙apt-cacherdependsxxx
增加一个光盘源
∙sudoapt-cdromadd
系统升级
∙sudoapt-getupdate
sudoapt-getdist-upgradeLUPA开源社区)A)b)E.[p8{%Sc6o
清除所以删除包的残余配置文件
∙dpkg-l|grep^rc|awk'{print$2}'|tr["n"][""]|sudoxargsdpkg-P-
编译时缺少h文件的自动处理
∙sudoauto-aptrun./configure
查看安装软件时下载包的临时存放目录
∙ls/var/cache/apt/archives
查看安装软件时下载包的临时存放目录
ls/var/cache/apt/archives
LUPA开源社区XW,~!
ZO]\hN%b
备份当前系统安装的所有包的列表
dpkg--get-selections|grep-vdeinstall>~/somefile
LUPA开源社区Cw1MWD.mE.\
从上面备份的安装包的列表文件恢复所有包
dpkg--set-selections<~/somefile
sudodselect
LUPA开源社区Vri$?
8hLUPA开源社区y.R[-lN.vz8in+s/G'p%k}m,aVQ0
查看包在服务器上面的地址
apt-get-qq--print-urisinstallssh|cut-d\'-f2
a`G.?
z#{K:
J/Jx'c0
系统
查看内核
∙uname-a
查看Ubuntu版本
∙cat/etc/issue
查看内核加载的模块
∙lsmod
查看PCI设备
∙lspci
查看USB设备
∙lsusb
查看网卡状态
∙sudoethtooleth0
查看CPU信息
∙cat/proc/cpuinfo
显示当前硬件信息
∙lshw
硬盘
查看硬盘的分区
∙sudofdisk-l
查看硬盘剩余空间
∙df-h
df-HLUPA开源社区zF;?
+mO
查看目录占用空间
∙du-hs目录名
优盘没法卸载
∙sync
fuser-km/media/usbdisk8@3u$p,o(p$|!
P9vf1s(K0
内存
查看当前的内存使用情况
∙free-l
进程
查看当前有哪些进程
∙ps-A
中止一个进程
∙kill进程号(就是ps-A中的第一列的数字)
或者killall进程名LUPA开源社区(p+@'`*qkz*pcj
强制中止一个进程(在上面进程中止不成功的时候使用)
∙kill-9进程号
或者killall-9进程名LUPA开源社区NH.U]$E]:
S;Z
查看当前进程的实时状况
∙top
查看进程打开的文件
∙lsof-p
ADSL
配置ADSL
∙sudopppoeconf
ADSL手工拨号
∙sudopondsl-provider
激活ADSL
∙sudo/etc/ppp/pppoe_on_boot
断开ADSL
∙sudopoff
查看拨号日志
∙sudoplog
如何设置动态域名
#首先去http:
//www.3322.org申请一个动态域名
#然後修改/etc/ppp/ip-up增加拨号时更新域名指令
sudovim/etc/ppp/ip-up
#在最後增加如下行
w3m-no-cookie-dump'http:
//username:
password@members.3322.org/dyndns/update?
system=dyndns&hostname=yourdns.3322.org'f2\j&c!
e.d"t9@0ujYz,o~/f0LUPA开源社区D5s/l@Iu.wJ4mu}7P;gvS0
网络
根据IP查网卡地址
∙arpingIP地址
查看当前IP地址
∙sudoifconfigeth0|awk'/inetaddr/{split($2,x,":
");printx[2]}'
查看当前外网的IP地址
∙w3m-no-cookie-dump|grep-o'[0-9]{1,3}.[0-9]{1,3}.[0-9]{1,3}.[0-9]{1,3}'
w3m-no-cookie-dump|grep-o'[0-9]{1,3}.[0-9]{1,3}.[0-9]{1,3}.[0-9]{1,3}'\^,Qkn-BPv0
查看当前监听80端口的程序
∙lsof-i:
80
查看当前网卡的物理地址
∙sudoarp-a|awk'{print$4}'
sudoifconfigeth0|head-1|awk'{print$5}'\*qw)Kq&a0
立即让网络支持nat
∙sudoecho1>/proc/sys/net/ipv4/ip_forward
sudoiptables-tnat-IPOSTROUTING-jMASQUERADELUPA开源社区Oi_P~v
查看路由信息
∙netstat-rn
sudoroute-n
LUPA开源社区B3`N.^W'ih$KuLUPA开源社区`W{T2j1P.?
+l;D
手工增加删除一条路由
∙sudorouteadd-net192.168.0.0netmask255.255.255.0gw172.16.0.1
sudoroutedel-net192.168.0.0netmask255.255.255.0gw172.16.0.1LUPA开源社区yiQYDJ~
修改网卡MAC地址的方法
∙sudoifconfigeth0down#关闭网卡
sudoifconfigeth0hwether00:
AA:
BB:
CC:
DD:
EE#然后改地址
sudoifconfigeth0up#然后启动网卡LUPA开源社区{VO5Cd,unzC"OA#]@