Websphere x64安装配置指南Word文档下载推荐.docx
《Websphere x64安装配置指南Word文档下载推荐.docx》由会员分享,可在线阅读,更多相关《Websphere x64安装配置指南Word文档下载推荐.docx(26页珍藏版)》请在冰点文库上搜索。
11.单击完成结束安装过程
下载安装补丁
下载补丁&
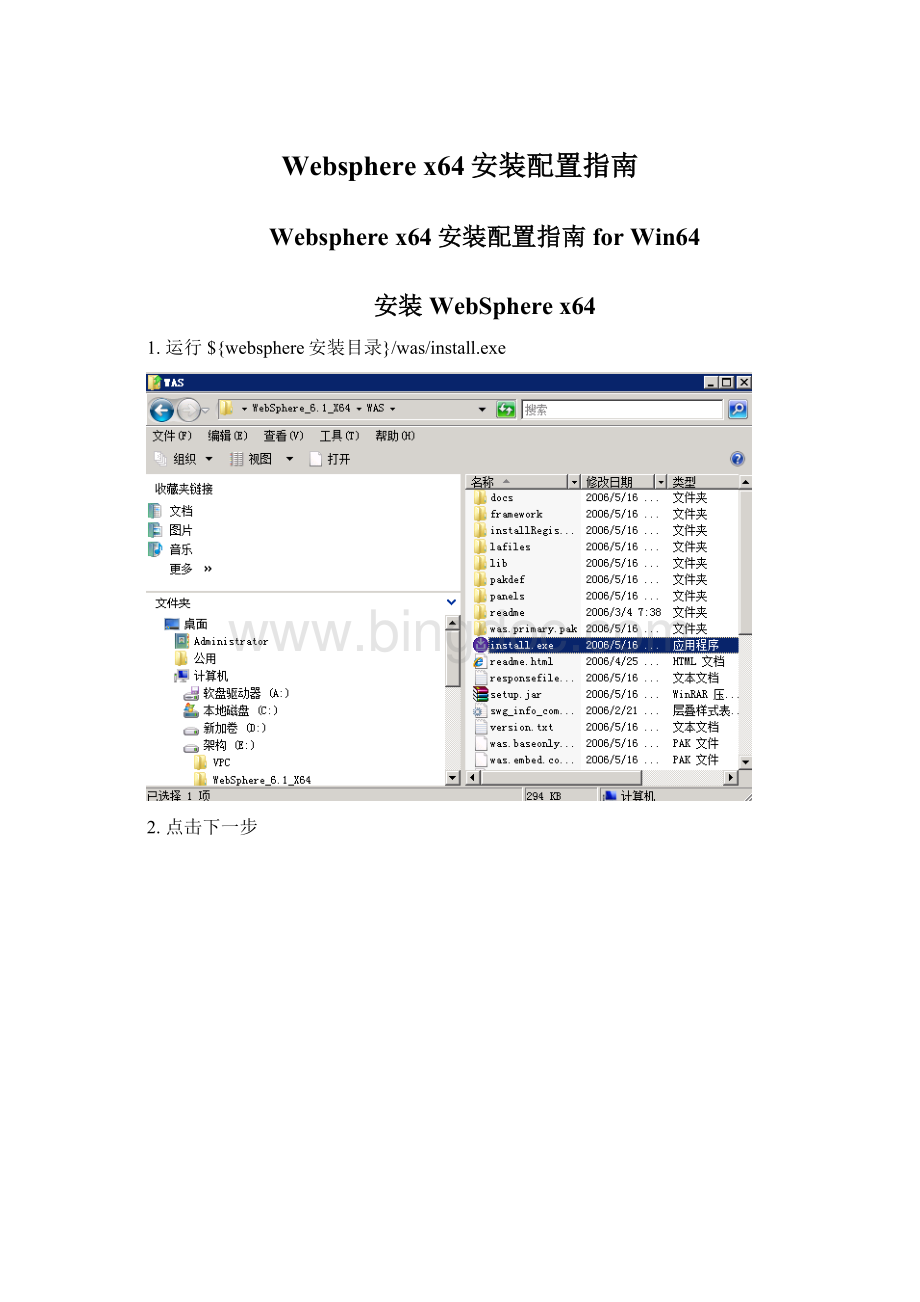
安装程序
1)浏览如下网址
2)选择最新的补丁包
3)选择最Windows标签
4)下载如下两个补丁
5)回到页面中上部,如下所示,
打开
6)下载如下更新安装程序
安装更新程序
解压更新程序
并执行UpdateInstaller/install.exe
安装补丁
把下载的补丁文件
下载的两个补丁如果扩展名是zip请改成pak
把两个补丁包拷贝到更新程序安装目录UpdateInstaller/maintenance
运行UpdateInstaller/update.exe
配置Websphere概要文件
Websphere基本概念
请参考《IBMWASND分布式网络环境的理解与集群的实现》
单元
单元是整个分布式网络中一个或多个节点的逻辑分组。
单元是一个配置概念,是管理员将节点间逻辑关联起来的实现方法。
管理员根据具体的业务环境,制定对其整体系统集成环境有意义的条件来定义和组织构成单元的节点。
就一般情况来说,可以将单元看作是最大的作用域。
在IBMWASND产品中,管理配置数据都存储在XML文件中。
单元保留了它每个节点中每台服务器的主配置文件。
同时每个节点和服务器也有其自己的本地配置文件。
如果服务器已经属于单元,则对于本地节点或服务器配置文件的更改都是临时的,通过在本地提交更改生效时,本地更改覆盖单元配置,但是当执行单元配置文档同步到节点的操作时,在单元级别上对主控服务器和主节点配置文件所作的更改将会替换对该节点所作的任何临时更改。
节点
节点是受管服务器(Server)的逻辑分组。
节点通常与具有唯一IP主机地址的逻辑或物理计算机系统对应,节点不能跨多台计算机。
节点分为受管节点与非受管节点。
关于Node、Profile与Server:
这三个概念比较容易混淆,我们拿出来对比说明:
Node=Profile。
Node是管理上使用的概念,Profile是实际的概要文件,它们代表同一事物。
Server就是所谓的ApplicationServerInstance,这是我们实际要布署Application的地方。
在IBMWASND产品中受管节点的NodeAgent目的就是让DeploymentManagerServer可以透过NodeAgent来管Node(Profile)中的ApplicationServerInstance,一个Node(Profile)中可以有多个ApplicationServerInstance。
如果是非ND版本,则属于SingleServer版本,那么一个Node(Profile)中只能有一个ApplicationServerInstance,如果你希望在一台机器上有多个ApplicationServerInstance,那就只
manageprofiles简介
创建概要文件需要用到manageprofiles.bat(Unix下是manageprofiles.sh)
Manageprofiles位于${Websphere安装目录}/bin下(例如E:
\IBM\WebSphere\AppServer\bin)
manageprofiles命令用来执行以下操作:
∙创建概要文件(-create)
∙删除概要信息(-delete)
∙扩充概要文件(-augment)
∙缩小概要文件(-unaugment)
∙删除所有概要文件(-deleteAll)
∙列出所有概要文件(-listProfiles)
∙获取概要文件名称(-getName)
∙获取概要文件路径(-getPath)
∙验证概要文件注册表(-validateRegistry)
∙验证并更新概要文件注册表(-validateAndUpdateRegistry)
∙获取缺省概要文件名称(-getDefaultName)
∙设置缺省概要文件名称(-setDefaultName)
∙备份概要文件(-backupProfile)
∙恢复概要文件(-restoreProfile)
可以通过manageprofiles-<
操作>
-help获取帮助,比如manageprofiles–create-help
执行操作需要用的的参数:
∙-profileNameprofile_name
∙-profilePathprofile_root
∙-templatePathtemplate_path
∙-nodeNamenode_name
∙-cellNamecell_name
∙-hostNamehost_name
∙-adminUserNameadminUser_ID
∙-adminPasswordadminPassword
∙-appServerNodeNameapplication_server_node_name
∙-backupFilebackupFile_name
∙-dmgrProfilePathdmgr_profile_path
∙-dmgrHostdmgr_host_name
∙-dmgrPortdmgr_port_number
∙-debug
∙-enableAdminSecuritytrue|false
∙-federateLatertrue|false
∙-isDefault
∙-isDeveloperServer
∙-nodeDefaultPorts
∙-nodePortsFilenode_ports_path
∙-nodeProfilePathnode_profile_path
∙-omitActionfeature1feature2...featureN
∙-responsereponse_file
∙-samplesPasswordsamplesPassword
∙-startingPortstarting_port|-portsFilefile_path|-defaultPorts
∙-validatePorts
∙-webServerChecktrue|false
∙-webServerHostnamewebserver_host_name
∙-webServerInstallPathwebserver_installpath_name
∙-webServerNamewebserver_name
∙-webServerOSwebserver_operating_system
∙-webServerPluginPathwebserver_plugin_path
∙-webServerPortwebserver_port
∙-webServerTypewebserver_type
∙
-enableServicetrue|false
-serviceUserNameservice_user_ID
-winserviceChecktrue|false
-winserviceAccountTypespecifieduser|localsystem
-winservicePasswordwinservice_password
-winserviceStartupTypemanual|automatic|disabled
-winserviceUserNamewinservice_user_ID
创建管理服务器概要文件
使用如下命令创建管理服务器
manageprofiles.bat-create-winserviceAccountTypelocalsystem-winserviceStartupTypeautomatic-enableAdminSecuritytrue-adminUserName管理员用户名-adminPassword管理员密码-profileName概要文件名-templatePath概要文件模板路径-hostName主机名-profilePath概要文件路径
样例命令
manageprofiles.bat-create-winserviceAccountTypelocalsystem-winserviceStartupTypeautomatic-enableAdminSecuritytrue-adminUserNamewasadmin-adminPasswordwasadmin-profileNamedmgr-templatePath"
E:
\IBM\WebSphere\AppServer\profileTemplates\dmgr"
-hostNamelocalhost-profilePath"
\IBM\WebSphere\AppServer\profiles\dmgr"
在概要文件路径/logs/AboutThisProfile.txt下有概要文件创建的一些端口信息
创建节点概要文件
使用如下命令创建节点概要文件
manageprofiles.bat-create-templatePath概要文件模板路径-profilePath概要文件路径-nodeName节点名-cellName单元名-profileName概要文件名-hostName主机名
命令样例
manageprofiles.bat-create-templatePathE:
/IBM/WebSphere/AppServer/profileTemplates/managed-profilePathE:
/IBM/WebSphere/AppServer/profiles/AppSrv01-nodeNamecfsNode01-cellNamecfsCell01-profileNameAppSrv01-hostNamelocalhost
创建节点代理为windows服务
命令:
WASService.exe-addwindows服务名-serverName服务名-profilePath概要文件路径–wasHomeWebsphere安装路径-logFile日志文件路径-logRoot日志目录-restarttrue-startTypeautomatic-stopArgs"
-username管理员用户名-password管理员密码"
命令样例:
WASService.exe-addWebSphereCFSNode-serverNamenodeagent-profilePathE:
\IBM\WebSphere\AppServer\profiles\AppSrv01-wasHomeE:
\IBM\WebSphere\AppServer-logFileE:
\IBM\WebSphere\AppServer\profiles\AppSrv01\logs\nodeagent\startNode.log-logRootE:
\IBM\WebSphere\AppServer\profiles\AppSrv01\logs\nodeagent-restarttrue-startTypeautomatic-stopArgs"
-usernamewasadmin-passwordwasadmin"
把节点加到管理服务器
⏹首先启动管理服务器
如下图启动windows服务
⏹执行命令addNode.bat
addNode.bat位于节点概要文件/bin目录
(比如E:
\IBM\WebSphere\AppServer\profiles\AppSrv01\bin)
命令格式:
addNode.bat主机名端口-username管理员用户名-password管理员密码
注:
端口是指管理服务器概要文件路径/logs/AboutThisProfile.txt如下行指定的端口:
DeploymentManagerSOAP连接器端口:
8879
addNode.batlocalhost8879-usernamewasadmin-passwordwasadmin
添加服务器
登陆https:
//localhost:
9043/ibm/console/logon.jsp
服务器应用服务器新建
保存到主配置
启动服务器
查看服务器的端口
WC_defaulthost就是web访问的端口
更改服务器启动的内存参数
填写如下值(以M为单位)
 升级会员
升级会员 