打印机产品说明书英文版.docx
《打印机产品说明书英文版.docx》由会员分享,可在线阅读,更多相关《打印机产品说明书英文版.docx(21页珍藏版)》请在冰点文库上搜索。
打印机产品说明书英文版
MANUALBOOK
A3-LK3900FlatbedPrinter
Website:
c:
\iknow\docshare\data\cur_work\
Add:
1st~2ndFloor,4Unit,HuangtianIndustrialPark,XixiangAvenue,BaoanDistrict,ShenzhenCity,GuangdongProvince,China(Nearby107Stateroad)
TEL:
9FAX:
2
MANUALBOOK
A3-LK3900FLATBEDPRINTER
●ThanksforPurchasingtheFlatbedPrinter
Thanksforyoursupport,andwearecongratulatingyounowownedanmultifunctionalandpowerfulflatbedinkjetprinterwithunlimitedmediasurfaceprintable.It’sahighperformance&wideapplicationrangeinkjetstylealmightyprintingmachine.
Followingissomeimportantsuggestionaboutusingmethod&securitytothisprinter,wesincerehopetheprinterinyourhandscouldbeappliedwithnomalfunction,pleasereadtheManualbeforeusingthisprinter,andbenoticetotheinformationabout“Note”&“Alarm”onthisManual.
And,pleasereadthroughthismanual;itisthebestguiderforyouandyouremployeestooperatethisprinter.
●SecurityNotice
Avoiddestroyingthisprinter&havingharmtothehumanbody,youmustobeythisrulebeindicatedonthispartof“Warn”onthismanual,Pleasealsocareforthepartof“”includingtheimportantinformationofoperatingandtheelse,unless,ifhavesomethingdestructedtothisprinterwhichdidnotobeytheusermanual,wewillnotperformthequalitymaintainingjobs.
●Announcement
Alongwiththequalitybeimproved,pleasekindlyunderstandthatwemightnothavesomethingbemodifiedonthismanualinfuture.
Chapter1
InstallationoftheFlatbedPrinter
A.PreparativebeforeinstallationtotheFlatbedInkjetPrinter.
a)Pleasehavegoodplacementtotheprinterwithaspacewithconditionsfornodust,awayfromheatsources&humidityair,firefountain,avoidingtobedirectinsunshine,andavoidingtobeshaken;also,Duringwork,theremightisalittletrembletotheprinter,pleasehaveatablewithsizeat85x60cmtobearthismachinetoavoidresonancewhichpossibleinfluencethequalityofprintingoutputting.
b)Beforeturningonthepoweroftheflatbedinkjetprinter,pleasekindlycheckifthepowerwithgoodconnectiontoterra,andalso,pleasekeepyoucomputersystemfarawayfromelectromagneticfield,forsuchassomethingsametospeakers,wirelessphone,andsoon.
c)Pleaseapplyundivided,withterraandstandardelectricaloutlettotheprinter,beforeapplication,pleaseensurethepowercordandpowerjackcouldbefullbeartheprinter,pleasedonotuseapowerjackwhichsharetotheotherequipments.Also,pleasekindlyhavecarefulchecktothepowercordtoensureitisnotdilapidated.
d)withpurposeofbeingconvenienttomovethisflatbedinkjetprinter,pleasehaveproperconservationtotheallaccessories&packagematerialstothisflatbedinkjetprinter.
Note:
1、inthismanualwealsocallthisFlatbedInkjetPrintertoPrinter。
2、WecallthealldevicestosystemequipmentsuchastoPrinter,Computer,scanneretc。
3、Theprintingobjectshouldiscalledmedia。
4、ThePrint-headwouldbeinkhead。
Alarm:
duringconveyance&placement,pleasedon’tmaketheupsidedown,andpleasedon’tmakeitbepressed&fallen。
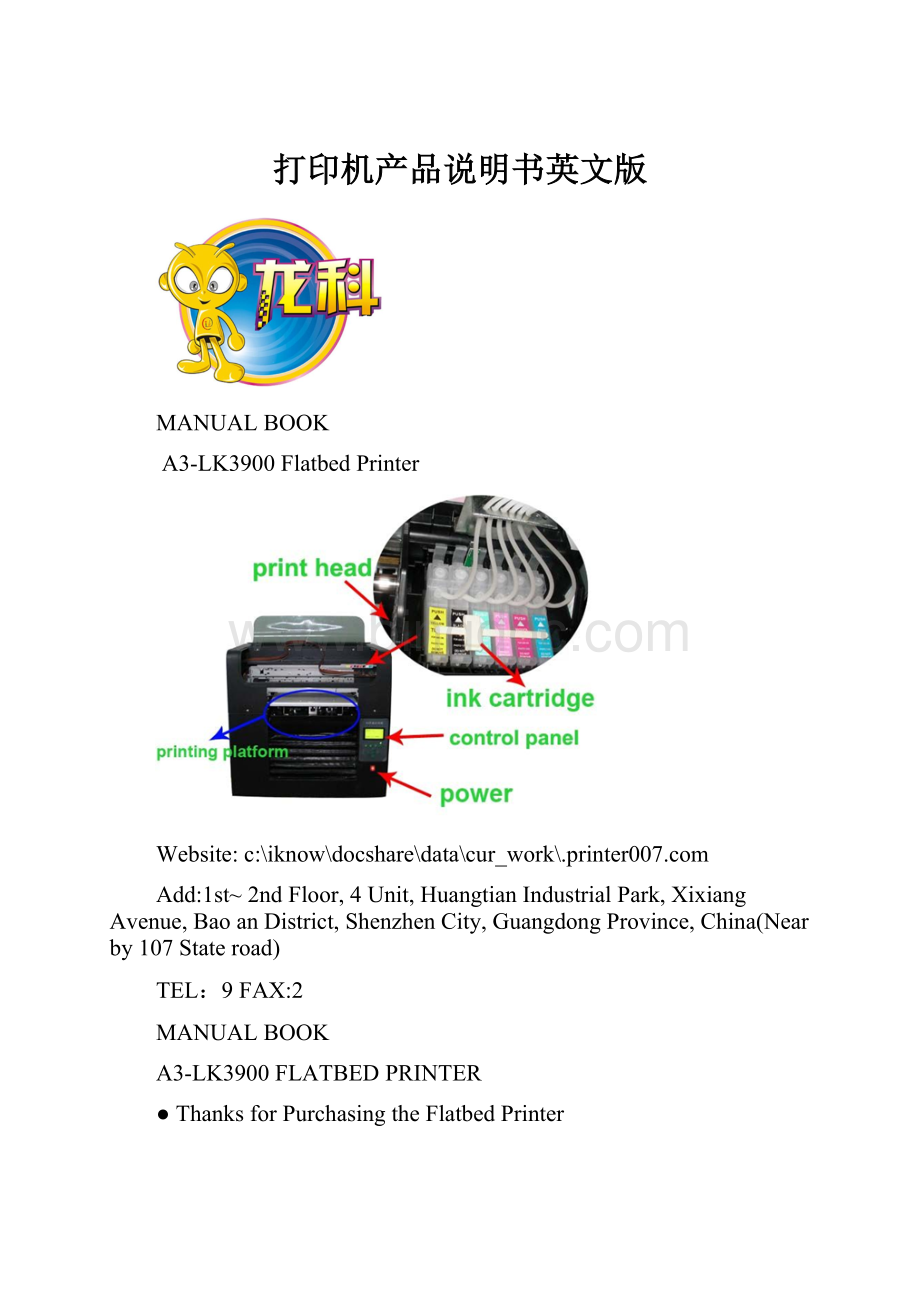
B.ComponentsDiagrammatizetotheprinter.
Note:
withpurposeforacorrectwaytoinstallthisprinter,youshouldknowthenameofeveryparts。
a)
Printingplatform—laytheprintobjects
b)Printhead—pleasetakecareofthismainpart
c)Inkcartridge—inkcartridge
d)Controlpanel—setting
e)Power—turnon/offthebottomframe
ControlPanel
1.
Batch
2.
Reset
3.
Droplet
4.
on/off
5.
up
6.
down
7.
out
8.
enter
9.
stop
C.Installationonprinter
1.Placetheprintertoproperworkingenvironment,keepenoughspaceforairiness.
2.Keepenoughspaceforforward&backwardmovementoftheprintingplatform.
3.Keepenoughspaceforupward&downwardforthemovementoftheplatform.
4.ConnecttheUSB&Wirecabletothecomputerorlaptop.
5.Turnonthepowerofbottomframefirstly,thentheplatformwillcomeout,youneedtopress"enter”,sotheplatformwillgobacktooriginalposition.Fivesecondslater,presspowerofprinter.
D:
InkInjection
Usethesyringesorfillerstofilleightcolorinkbottlewithcorrespondingink.Donotfilleachbottlefullywithinks;filltheinkbottleswithhalffull,leavehalfspacefortheair.
Afterthat,keepthebigpluginsertedandsmallplugout.
InkPumping
a、opentheWasteinkwarehousedoor
b、useasyringetoconnectoneofwasteinkpipe,stoptheotherpipeandstarttotwitchstrengthenchangetheotherpipetotwitchsyringe,repeatedoperationseveraltimestillalltheeightcolorinkgototheinkcartridges.
Note:
Forindicatingthecoloroftheink,wehavemarkeditwithsignasbelow:
Cyan(blue)—C、Magenta(Red)—M、Yellow—Y、Black—PK、
LightCyan(LightBlue)—LC、LightMagenta(LightRed)—LM
MatteBlack—MK、GrossOil—GO
Warnings
1.Theinkshouldbefillintothecorrespondingcartridge.TheRefillshouldbefinishedintheshortesttimetoavoidinganydustgoingintotheContinuesInkSupplySystem.
2.TheECOSolventInkshouldbeusedastheexclusiveinkforourflatbedprinter.Themachinewillnotbeinguaranteebyanyotherkindofink.
3.Theinkshouldbestoragesbyhermeticandfire-resistancecondition.
E.Installationoncomputer
1.InstalltheEpsonStylusR1900DrivefromtheCD-Romordownloadfromwebsite
2.Click“Manual”
3.ThesystemwillinstalltheDriveautomatically.
Note:
USBcableconnectingisadvised
Pleasedo"nozzlecheck"first,ifallthecolorinkcomeoutandlinesaretidy,youcanprint.Ifnot,pleasedo"headcleaning".
(Repeat“HeadCleaningifnecessary.)
Allthestepsforinstallationarefinished,andyoucanstarttousetheprinternow.
CHAPTERTWO
USINGPRINTER
A.Processforoperatetheprinter.
Cautions:
beforeoperatingthisprinter,youshouldunderstandthetotalprocessforoperatingtheprinter.
B.Hereisthemainprocessforsampleprinting:
◆StepOne:
ImageInputting
Imageinputtingcanbefinishedbydigitalcamera,scannerandotherdevicestoinputimage.Anysoftwarecanbeusedforeditingtheimagesuchas:
Photoshop,CorelDraw,AdobeIllustrate,ect.
◆StepTwo:
Pre-Coating:
a.BeforeusingtheManualCoating,pleaseshakethepackingcaninabouthalfminute,makeitiswellfixed,keepthedistanceatabout20-30cmforthehead&media,pressthespraynozzleforasymmetricaljob(LeftImage)。
b.Waitforacoupleofminutesforthedryinginnormalcondition.Speedupdryingbyheatingisalsoavailable.
Cautions:
Forthebarreledcoating,theAirPressureMachineandSpraygunisneeded.
Cautions:
1.Pleasedonottouchthecoatingsurfacebeforedrying
2.Makesurethesurfaceofthematerialiscleanbeforecoating
3.Professional&Semi-Professionaloperatorisadvisedforcoatings.
◆StepThree:
HeightAdjustment
a.Theoperatorshouldmovethebeddingtoaproperpositionforbestprintingeffort.
b.Press“Up”buttonover2seconds,thebeddingwillmovingupwardautomatically.
c.Thebeddingmovingwillstopautomaticallybythesensorwhenitis3-5mmawayfromthematerial.
d.Youcanadjusttheheightmanuallyduringprinting.
Warnings:
Themediaonflatbedmustbeplacedonthestartingpositionoftheflatbed.Unevenobjectsarerequiredtoadjusttheheightbymanually.
◆StepFour:
Edit
1.EditpictureinCorelDraw/Photoshop/AIsoftware
InstallCorelDrawsoftwaretoyourcomputer.
OpenCorelDrawandeditthepagesizeto329mm*600mm,whichisthesameastheprintingareaofprinter.
2.Sizetheprintingmaterial
3.PressF6tocreatea1:
1imageaccordingtothematerialsize.
4.CoverthebeddingwithA4sizepaper.
5.ImportapicturefromyourcomputertoCorelDraw,thenholddownyour
rightmousebutton,dragthepictureinthebox,choosethe3rditemPowerClip
inside.Next,pressrightmousetochoosethe2nditemeditcontents.
6.Checkittoappropriatesizeandchoose3rditemFinishingEditingThisLevel,moveyourmousetothetoprightcorner,clickrighttodeleteframe.
7.Laythematerialonthepaper.
8.Printingtheimageonthemateria.
◆StepFive:
Epsonsetting
1.Aftereditingthepicture,youcanstarttoprint.ChooseR1900printer,thenclicktherightbutton"Properties".
2.choosethe2nditem"Advanced",thensetasbelowpicture.
3.Cachous"UserDefined”,changethesizeto3290*6000(unit:
0.01cm)andyoucanprint.
Alarm:
Theplatformmustbeputbackwardlimitbeforeprinting.
E.Cleaningforprinthead(Manual)
IftheNozzlesinprintheadiscloggedandcannotdredgedby“HeadCleaning”function,Pleasefollowtheunderstepstocleanit.
MovethePrint-headtostartingposition>Pullouttheinkcartridge>Connectingthesyringeandprintheadbytube>Infusethecleaningsolutionuntiltheinkflowsthroughthetubeofdeposeink>Pullbackthesyringe,theinkwillreflowtofromthetube>Repeat2-3times>Replacethecartridge>Guidetheinkfromthedeposeinkbottle>reboottheprinter>Nozzlechecking.
ChapterFive:
ACCESSORY
A.Technicalparameter:
PrintingTechnology
INKJETPIEZO
PrintingSize
A3+329mmX600mm
EquipmentSize(cm)
95X65X110(LXWXH)
EquipmentWeight
45Kg
PrintingSpeed
5Minutesforfullsize
PrintingThickness
20cm
PrintingWeight
Max10Kg
Transferringport
IEEE-1284Parallel/USBSerialPort
PrintingPrecision
5760dpi/2880dpi/1440dpi/720dpi/360dpi
Ink
8ColorsECOSolventInk
InkSupply
Continuousinksupplysystem
PowerSupply
AC220V/55W
OperatingSystem
WIN2000/NT/XP/MAC(USB)
WorkCondition
Temperature10~35,Humidity20~80%
 升级会员
升级会员 