Andfix学习记录Word文档下载推荐.docx
《Andfix学习记录Word文档下载推荐.docx》由会员分享,可在线阅读,更多相关《Andfix学习记录Word文档下载推荐.docx(20页珍藏版)》请在冰点文库上搜索。
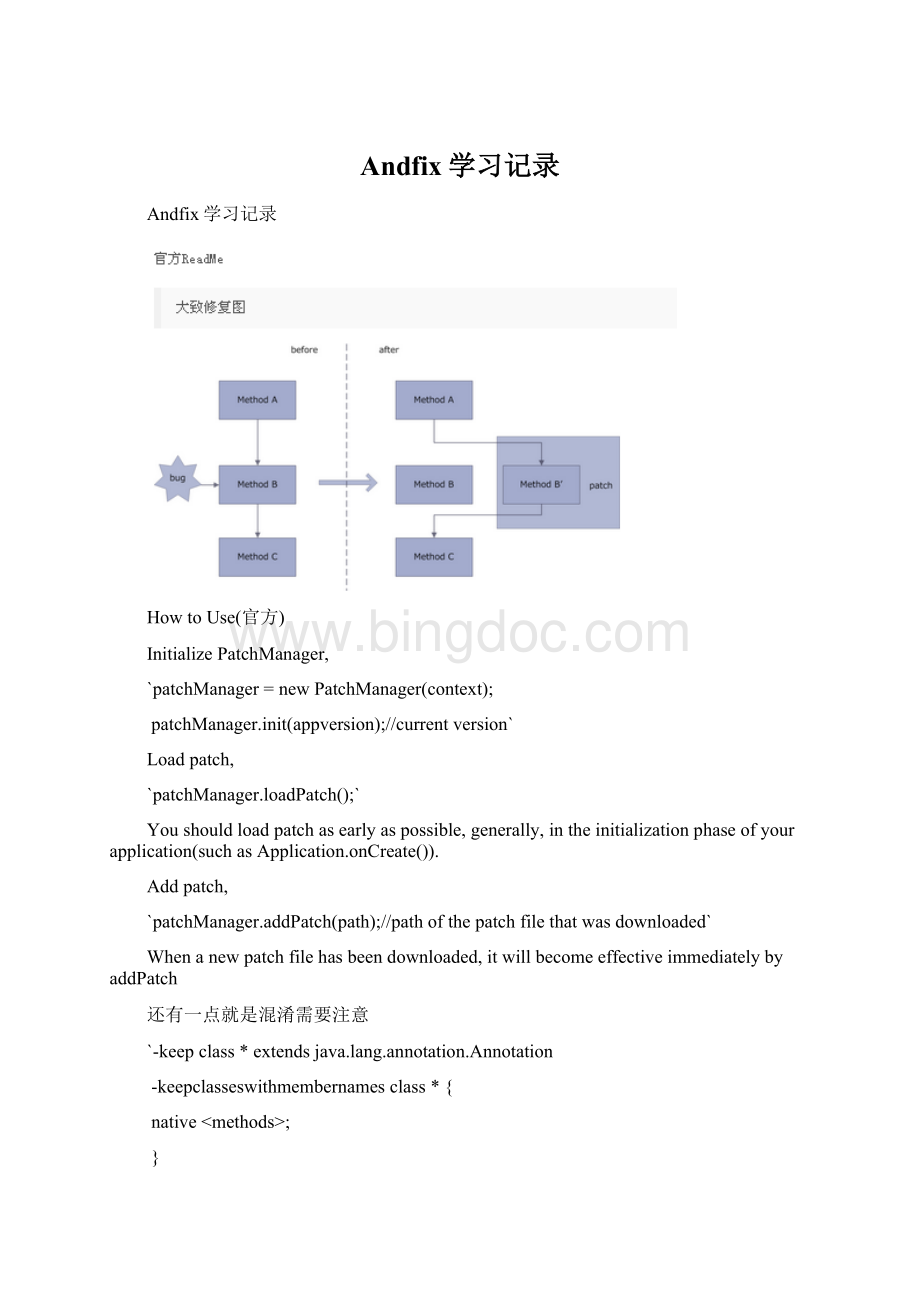
原理篇
andfix深入
补丁深入
andfix原理
andfix的核心原理就是方法替换在通过其apath工具给需要替换的方法加上注解@repleaceMethod,这样在执行时把有bug的方法替换成补丁文件中执行的方法。
(在Native层使用指针替换的方式替换bug的方法,从而达到修复bug的目的),具体过程如下图:
使用虚拟机的JarFile加载的补丁文件,读取PATCH.MF文件得到补丁类名称
获取补丁方法
使用DexFile读取patch文件的dex文件,获取后根据注解获取补丁方法
获取bug所在的方法
根据注解中获取到的类名和方法,使用ClassLaoder获取到class,然后根据反射得到bugMethod,并将其访问属性修改为public
—————————————–Java层————————————————————-
Native层替换方法
使用JNI来替换bug所在方法对象的属性来修复bug
简要类之间关系图
修复的具体过程为:
1)我们及时修复好bug之后,我们可以apkpatch工具将两个apk做一次对比,然后找出不同的部分。
生成的apatch了文件。
若果这个时候,我们把后缀改成zip再解压开,里面有一个dex文件。
反编译之后查看一下源码,里面就是被修复的代码所在的类文件,这些更改过的类都加上了一个_CF的后缀,并且变动的方法都被加上了一个叫@MethodReplace的annotation,通过clazz和method指定了需要替换的方法。
(后面补丁原理会说到)
2)客户端得到补丁文件后就会根据annotation来寻找需要替换的方法。
从AndFixManager.fix方法开始,客户端找到对应的需要替换的方法,然后在fix方法的具体实现中调用fixClass方法进行方法替换过程。
3)由JNI层完成方法的替换。
fixClass方法遍历补丁class里的方法,在jni层对所需要替换的方法进行一一替换。
(AndfixManager#replaceMethod)
源码解析
遵循使用时四步走:
Step1:
初始化PatchManger
`PatchManagerpatchManager=newPatchManager();
参阅patchManager类源码——>
AndfixManager其中包含了Compat兼容性检测类、SecurityChecker安全性检查类
`publicAndFixManager(Contextcontext){
mContext=context;
//判断机型是否支持Andfix阿里的YunOs不支持
mSupport=Compat.isSupport();
if(mSupport){
//初始化签名判断类
mSecurityChecker=newSecurityChecker(mContext);
mOptDir=newFile(mContext.getFilesDir(),DIR);
//makedirectoryfail
if(!
mOptDir.exists()&
&
!
mOptDir.mkdirs()){
mSupport=false;
Log.e(TAG,"
optdircreateerror."
);
}elseif(!
mOptDir.isDirectory()){//notdirectory
//如果不是目录则删除
mOptDir.delete();
}`
Step2:
使用PatchManger检查版本
`patchManager.init(apk版本)`
参阅patchManager#init——>
Patch构造函数初始化init
主要是版本比对,记录版本号;
根据版本号将patch清除或者加载到缓存中
参阅Patch#init
`publicvoidinit(StringappVersion){
mPatchDir.exists()&
mPatchDir.mkdirs()){//makedirectoryfail
patchdircreateerror."
return;
mPatchDir.isDirectory()){//notdirectory
mPatchDir.delete();
SharedPreferencessp=mContext.getSharedPreferences(SP_NAME,
Context.MODE_PRIVATE);
//缓存版本号
Stringver=sp.getString(SP_VERSION,null);
if(ver==null||!
ver.equalsIgnoreCase(appVersion)){
//根据传入版本号作对比,若不同,则删除本地的补丁文件
cleanPatch();
sp.edit().putString(SP_VERSION,appVersion).commit();
//传入新的版本号
}else{
initPatchs();
//初始化patch列表,把本地的patch加载到内存中
}
privatevoidinitPatchs(){
File[]files=mPatchDir.listFiles();
for(Filefile:
files){
addPatch(file);
Patch文件的加载使用JarFile读取Patch文件,读取一些属性如patchname,createtime,其中如果本地保存了多个补丁,那么AndFix会按照补丁生成的时间顺序加载补丁。
具体是根据.apatch文件中的PATCH.MF的字段Created-Time。
step3:
loadPatch
参阅patchManager#loadPatch
提供了3个重载方法
`publicvoidloadPatch()//andfix初始化之后调用
privatevoidloadPatch(Patchpatch)//下载补丁完成后调用,addPatch(path)
publicvoidloadPatch(StringpatchName,ClassLoaderclassLoader)//提供了自定义类加载器的实现
这三个核心都是调用了publicsynchronizedvoidfix(Filefile,ClassLoaderclassLoader,Listclasses)
参看AndfixManager#fix
`publicsynchronizedvoidfix(Filefile,ClassLoaderclassLoader,
List<
String>
classes){
mSupport){
//判断补丁的签名
mSecurityChecker.verifyApk(file)){//securitycheckfail
try{
Fileoptfile=newFile(mOptDir,file.getName());
booleansaveFingerprint=true;
if(optfile.exists()){
//needtoverifyfingerprintwhentheoptimizefileexist,
//preventsomeoneattackonjailbreakdevicewith
//Vulnerability-Parasyte.
//btw:
exaggeratedandroidVulnerability-Parasyte
//
//如果本地已经存在补丁文件,则校验指纹信息
if(mSecurityChecker.verifyOpt(optfile)){
saveFingerprint=false;
optfile.delete()){
//加载patch文件中的dex
finalDexFiledexFile=DexFile.loadDex(file.getAbsolutePath(),
optfile.getAbsolutePath(),Context.MODE_PRIVATE);
if(saveFingerprint){
mSecurityChecker.saveOptSig(optfile);
ClassLoaderpatchClassLoader=newClassLoader(classLoader){
//重写了ClassLoader的findClass方法
@Override
protectedClass<
?
>
findClass(StringclassName)
throwsClassNotFoundException{
Class<
clazz=dexFile.loadClass(className,this);
if(clazz==null
&
className.startsWith("
com.alipay.euler.andfix"
)){
returnClass.forName(className);
//annotation注解class
//notfound
if(clazz==null){
thrownewClassNotFoundException(className);
returnclazz;
};
Enumeration<
entrys=dexFile.entries();
clazz=null;
while(entrys.hasMoreElements()){
Stringentry=entrys.nextElement();
if(classes!
=null&
classes.contains(entry)){
continue;
//skip,notneedfix
clazz=dexFile.loadClass(entry,patchClassLoader);
//获取有bug的类文件
if(clazz!
=null){
fixClass(clazz,classLoader);
//核心-
}catch(IOExceptione){
pacth"
e);
fix——>
fixclass——>
replaceMethod——>
Andfix#replaceMethod(Methoddest,Methodsrc)Native方法
`privatevoidfixClass(Class<
clazz,ClassLoaderclassLoader){
//反射找到clazz中的所有方法
Method[]methods=clazz.getDeclaredMethods();
//MethodReplace的注解
MethodReplacemethodReplace;
Stringclz;
Stringmeth;
for(Methodmethod:
methods){
//遍历所有方法,找到有MethodReplace注解的方法,即需要替换的方法
methodReplace=method.getAnnotation(MethodReplace.class);
//获取此方法的注解,有bug的方法生成patch的类中的方法都是有注解的
if(methodReplace==null)
clz=methodReplace.clazz();
//获取注解中的clazz的值
meth=methodReplace.method();
//获取注解中method的值
isEmpty(clz)&
isEmpty(meth)){
//找到需要替换的方法后调用replaceMethod替换方法
replaceMethod(classLoader,clz,meth,method);
`privatevoidreplaceMethod(ClassLoaderclassLoader,Stringclz,
Stringmeth,Methodmethod){
Stringkey=clz+"
@"
+classLoader.toString();
//根据key查找缓存中的数据,该缓存记录了已经被修复过得class
clazz=mFixedClass.get(key);
if(clazz==null){//classnotload
//找不到说明该class没有被修复过,则通过类加载器去加载
clzz=classLoader.loadClass(clz);
//initializetargetclass
//通过C层改写accessFlag,把需要替换的类的所有方法(Field)改成了public
clazz=AndFix.initTargetClass(clzz);
//初始化targetclass
=null){//initializeclassOK
mFixedClass.put(key,clazz);
Methodsrc=clazz.getDeclaredMethod(meth,
method.getParameterTypes());
//根据反射拿到有bug的类的方法
//这里是调用了jni,art和dalvik分别执行不同的替换逻辑,在cpp进行实现
AndFix.addReplaceMethod(src,method);
//替换方法src是有bug的方法,method是补丁方法
}catch(Exceptione){
replaceMethod"
Natvie方法的分析见下面
前三步都是一开始初始化时候要做的,而最后一步第四步则是补丁下载好之后再做的
step4:
添加Patch
`patchManager.addPatch(path)`
参阅PatchManager#addPatch,最终还是执行loadpatch
appPatch——>
copy到andfix默认的文件夹下——>
执行loadPatch(补丁立即生效)
`publicvoidaddPatch(Stringpath)throwsIOException{
Filesrc=newFile(path);
Filedest=newFile(mPatchDir,src.getName());
if(!
src.exists()){
thrownewFileNotFoundException(path);
if(dest.exists()){
Log.d(TAG,"
patch["
+path+"
]hasbeloaded."
//这一步很重要,通过这一步将你所下载保存的patch文件,copy到andfix自己默认的文件夹内存的data/data/apatch
FileUtil.copyFile(src,dest);
//copytopatch'
sdirectory
Patchpatch=addPatch(dest);
if(patch!
//加载patch补丁立即生效
loadPatch(patch);
小结一下:
可以看出andfix的核心就是两大步
-java层实现加载补丁文件,安全验证等操作,然后根据补丁汇总的注解找到将要替换的方法,交给Native层去处理替换方法
-native层:
利用Javahook的技术来替换要修复的方法
附Native分析
在JNI目录下art和darvik文件中
andfix.cpp#replaceMethod——>
art_method_replace.cpp(根据版本)——art_method_replace_5_0.cpp
Dalvik
Dalvik是Google公司自己设计用于Android平台的Java虚拟机。
Dalvik虚拟机是Google等厂商合作开发的Android移动设备平台的核心组成部分之一。
它可以支持已转换为.dex(即DalvikExecutable)格式的Java应用程序的运行,.dex格式是专为Dalvik设计的一种压缩格式,适合内存和处理器速度有限的系统。
Dalvik经过优化,允许在有限的内存中同时运行多个虚拟机的实例,并且每一个Dalvik应用作为一个独立的Linux进程执行。
独立的进程可以防止在虚拟机崩溃的时候所有程序都被关闭。
ART
Android操作系统已经成熟,Google的Android团队开始将注意力转向一些底层组件,其中之一是负责应用程序运行的Dalvik运行时。
Google开发者已经花了两年时间开发更快执行效率更高更省电的替代ART运行时。
ART代表AndroidRuntime,其处理应用程序执行的方式完全不同于Dalvik,Dalvik是依靠一个Just-In-Time(JIT)编译器去解释字节码。
开发者编译后的应用代码需要通过一个解释器在用户的设备上运行,这一机制并不高效,但让应用能更容易在不同硬件和架构上运行。
ART则完全改变了这套做法,在应用安装时就预编译字节码到机器语言,这一机制叫Ahead-Of-Time(AOT)编译。
在移除解释代码这一过程后,应用程序执行将更有效率,启动更快。
-优缺点
ART优点:
1、系统性能的显著提升。
2、应用启动更快、运行更快、体验更流畅、触感反馈更及时。
3、更长的电池续航能力。
4、支持更低的硬件。
ART缺点:
1、更大的存储空间占用,可能会增加10%-20%。
2、更长的应用安装时间。
总的来说ART的功效就是“空间换时间”。
其他重要函数
PatchManage#removeAllPatch()
这个函数是在PatchManage#init(viersin)verision不同时调用的方法一样,清空补丁目录文件,这在做保护的时候十分重要。
`publicvoidremoveAllPatch(){
sp.edit().clear().commit();
比如在laodPatch,包括初始化的时候patchManager.loadPatch()和patchManager.addPatch(其实也是调用loadpath)
`publicvoidloadPatch(){
mLoaders.put("
*"
mContext.getClassLoader());
//wildcard
Set<
patchNames;
classes;
for(Patchpatch:
mPatchs){
patchNames=patch.getPatchNames();
for(StringpatchName:
patchNames){
classes=patch.getClasses(patchName);
//获取patch对用的class类集合
mAndFixMan
 升级会员
升级会员 