Android布局管理器详细解析布局实现.docx
《Android布局管理器详细解析布局实现.docx》由会员分享,可在线阅读,更多相关《Android布局管理器详细解析布局实现.docx(36页珍藏版)》请在冰点文库上搜索。
Android布局管理器详细解析布局实现
Android布局管理器–详细解析布局实现
布局管理器都是以ViewGroup为基类派生出来的;使用布局管理器可以适配不同手机屏幕的分辨率,尺寸大小;
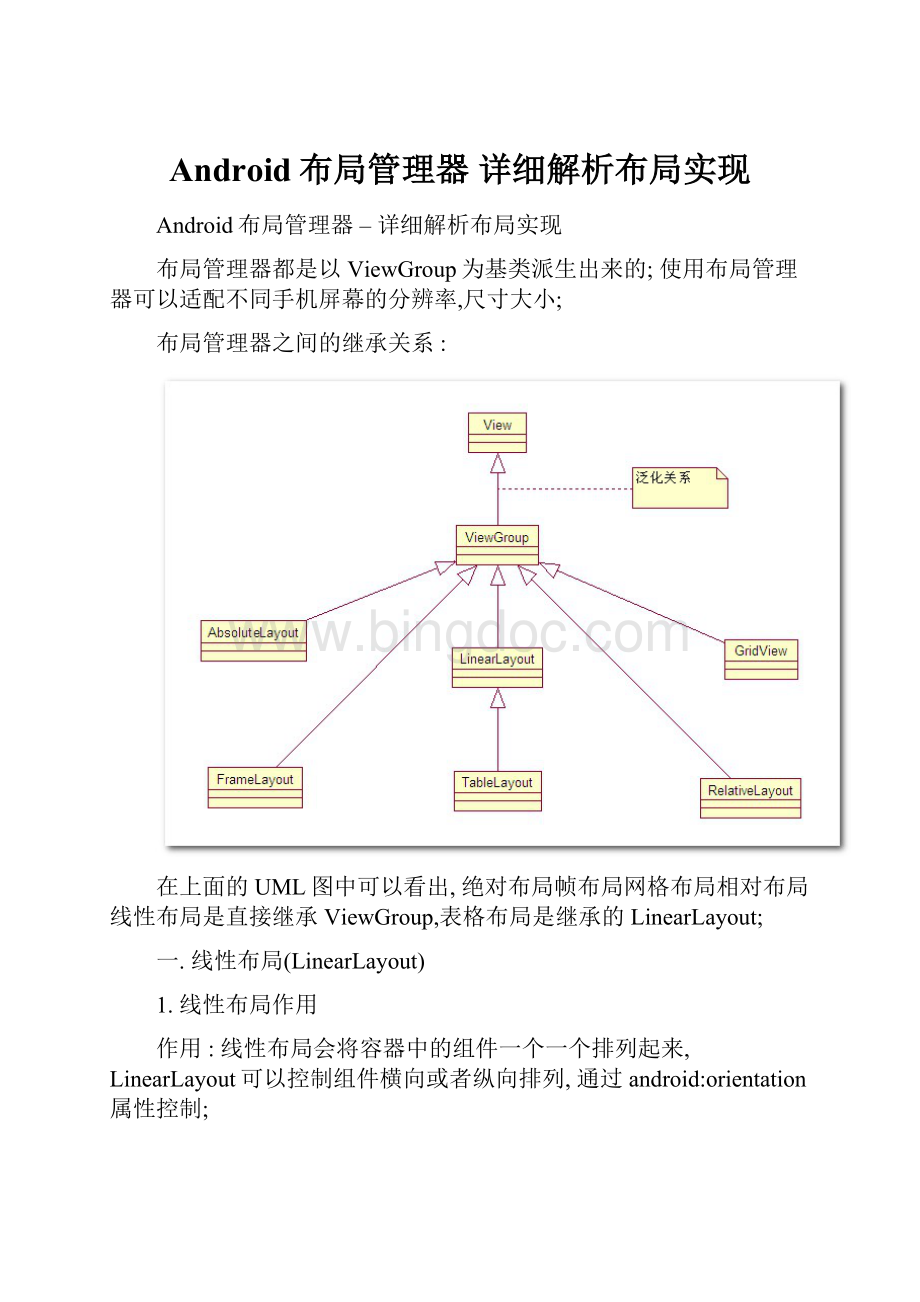
布局管理器之间的继承关系 :
在上面的UML图中可以看出, 绝对布局帧布局网格布局相对布局线性布局是直接继承ViewGroup,表格布局是继承的LinearLayout;
一.线性布局(LinearLayout)
1.线性布局作用
作用 :
线性布局会将容器中的组件一个一个排列起来,LinearLayout可以控制组件横向或者纵向排列,通过android:
orientation属性控制;
不换行属性 :
线性布局中的组件不会自动换行,如果组件一个一个排列到尽头之后,剩下的组件就不会显示出来;
2.LinearLayout常用属性
(1)基线对齐
xml属性 :
android:
baselineAligned;
设置方法 :
setBaselineAligned(booleanb);
作用 :
如果该属性为false,就会阻止该布局管理器与其子元素的基线对齐;
(2)设分隔条
xml属性 :
android:
divider;
设置方法 :
setDividerDrawable(Drawable);
作用 :
设置垂直布局时两个按钮之间的分隔条;
(3)对齐方式(控制内部子元素)
xml属性 :
android:
gravity;
设置方法 :
setGravity(int);
作用 :
设置布局管理器内组件(子元素)的对齐方式,
支持的属性 :
top,bottom,left,right,
center_vertical(垂直方向居中), center_horizontal(水平方向居中),
fill_vertical(垂直方向拉伸), fill_horizontal(水平方向拉伸),
center,fill, clip_vertical,clip_horizontal;
可以同时指定多种对齐方式:
如left|center_vertical左侧垂直居中;
(4)权重最小尺寸
xml属性 :
android:
measureWithLargestChild;
设置方法 :
setMeasureWithLargestChildEnable(booleanb);
作用 :
该属性为true的时候,所有带权重的子元素都会具有最大子元素的最小尺寸;
(5)排列方式
xml属性 :
android:
orientation;
设置方法 :
setOrientation(inti);
作用 :
设置布局管理器内组件排列方式,设置为horizontal(水平),vertical(垂直),默认为垂直排列;
3.LinearLayout子元素控制
LinearLayout的子元素,即LinearLayout中的组件, 都受到LinearLayout.LayoutParams控制,因此LinearLayout包含的子元素可以执行下面的属性.
(1)对齐方式
xml属性:
android:
layout_gravity;
作用:
指定该元素在LinearLayout(父容器)的对齐方式;
(2)所占权重
xml属性:
android:
layout_gravity;
作用:
指定该元素在LinearLayout(父容器)中所占的权重;
4.控制子元素排列与在父元素中排列
控制本身元素属性与子元素属性 :
带layout的属性是设置本身,例如android:
layout_gravity设置的是本身的对其方式;不带layout的属性是设置其所包含的子元素,例如android:
gravity设置的是该容器子组件的对齐方式;
所有的布局管理器都提供了相应的LayoutParams内部类,这些内部类用于控制布局中子元素的布局,如对齐方式layout_gravity,所占权重layout_weight,这些属性用于设置本元素在父容器中的对齐方式;
android:
gravity作用是指定本元素包含的子元素的对齐方式,只有容器才支持这个属性;
5.常见用法
(1)获取LinearLayout的宽高
a.组件外无法获取组件宽高
调用View.getHeight()和View.getWidth()方法是获取不到组件的宽度和高度的,这两个方法返回的是0;Android的运行机制决定了无法在组件外部使用getHeight()和getWidth()方法获取宽度和高度,在自定义的类中可以在View的类中通过调用这两个方法获取该View子类组件的宽和高;
b.组件外部获取View对象宽高方法
使用View.getMeasuredWidth()和View.getMeasuredHeight()方法可以获取组件的宽和高,在调用这个方法之前,必须先调用View.measure()方法,才可以,否则也获取不到组件的宽高;
注意:
如果组件宽度或高度设置为fill_parent,使用getMeasuredHeight()等方法获取宽度和高度的时候,并且组件中含有子元素时,所获取的实际值是这些组件所占的最小宽度和最小高度.
示例:
Viewview=getLayoutInflater().inflate(R.layout.main,null);
LinearLayoutlayout=(LinearLayout)view.findViewById(R.id.linearlayout);
//调用测量方法,调用了该方法之后才能通过getMeasuredHeight()等方法获取宽高
layout.measure(0,0);
//获取宽度
intwidth=layout.getMeasuredWidth();
//获取高度
intheight=layout.getMeasuredHeight();
c.获取布局文件中组件的宽高
调用View.getLayoutParams().width和View.getLayoutParams().height获取宽高,如果宽高被设定为fill_parent,match_parent,warp_content时,这两个两边直接回返回FILL_PARENT,MATCH_PARENT,WARP_CONTENT常量值;
(2)在LinearLayout中添加分隔线
a.使用ImageView添加(低版本3.0以下)
如果布局是vertical,那么设置一个ImageView宽度fill_parent,高度2dp,设置一个背景色;
如果布局是horizontal,那么设置一个ImageView宽度2dp,高度fill_parent,设置一个背景色;
android:
layout_width="fill_parent"
android:
layout_height="2dp"
android:
background="#F00"/>
b.使用xml属性添加(3.0以上版本)
设置LinearLayout标签的android:
showDividers属性,该属性有四个值:
none:
不显示分隔线;
beginning:
在LinearLayout开始处显示分隔线;
middle:
在LinearLayout中每两个组件之间显示分隔线;
end:
在LinearLayout结尾处显示分隔线;
设置android:
divider属性,这个属性的值是一个Drawable的id;
c.使用代码添加(3.0以上版本)
设置显示分隔线样式:
linearLayout.setShowDividers(),设置android:
showDividers属性;
设置分隔线图片:
linearLayout.setDividerDrawable(),设置android:
divider属性;
6.实际案例
(1)按钮排列
要点:
左边的LinearLayout的android:
gravity属性为bottom|center_horizontal;
右边的LinearLayout的android:
gravity属性为right|center_vertical;
代码:
xmlversion="1.0"encoding="utf-8"?
>
xmlns:
android="
android:
layout_width="fill_parent"
android:
layout_height="fill_parent"
android:
orientation="vertical"
android:
gravity="bottom|center_horizontal">
android:
layout_width="wrap_content"
android:
layout_height="wrap_content"
android:
text="按钮1"/>
android:
layout_width="wrap_content"
android:
layout_height="wrap_content"
android:
text="测试按钮2"/>
android:
layout_width="wrap_content"
android:
layout_height="wrap_content"
android:
text="按钮3"/>
android:
layout_width="wrap_content"
android:
layout_height="wrap_content"
android:
text="测试按钮4"/>
android:
layout_width="wrap_content"
android:
layout_height="wrap_content"
android:
text="按钮5"/>
通过修改android:
gravity属性来控制LinearLayout中子元素的排列情况;
左边的图的属性为bottom|center_horizontal,右边的android:
gravity的属性值为right|center_vertical;
(2)三个按钮各自对齐
三个水平方向的按钮,分别左对齐,居中对齐,右对齐:
要点:
最顶层的LinearLayout的orientation是horizontal水平的;
第二层的LinearLayout的orientation是vertical垂直的,并且宽度是fill_parent,依靠权重分配宽度;
按钮的android:
layout_gravity属性根据需求left,center,right,默认为left;
代码:
xmlversion="1.0"encoding="utf-8"?
>
xmlns:
android="
android:
layout_width="fill_parent"
android:
layout_height="fill_parent"
android:
orientation="horizontal">
android:
layout_width="fill_parent"
android:
layout_weight="1"
android:
layout_height="wrap_content"
android:
orientation="vertical"
android:
background="#f00">
android:
layout_width="wrap_content"
android:
layout_height="wrap_content"
android:
text="按钮1"/>
android:
layout_width="fill_parent"
android:
layout_weight="1"
android:
layout_height="wrap_content"
android:
orientation="vertical"
android:
background="#0f0">
android:
layout_width="wrap_content"
android:
layout_height="wrap_content"
android:
text="按钮2"
android:
layout_gravity="center"/>
android:
layout_width="fill_parent"
android:
layout_weight="1"
android:
layout_height="wrap_content"
android:
orientation="vertical"
android:
background="#00f">
android:
layout_width="wrap_content"
android:
layout_height="wrap_content"
android:
text="按钮3"
android:
layout_gravity="right"/>
二.相对布局RelativeLayout
相对布局容器中,子组件的位置总是相对兄弟组件,父容器来决定的;
1.RelativeLayout支持的属性
(1)对齐方式
xml属性:
android:
gravity;
设置方法:
setGravity(int);
作用:
设置布局容器内子元素的对齐方式;
(2)忽略对齐方式
xml属性:
android:
ignoreGravity;
设置方法:
setIgnoreGravity(int);
作用:
设置该组件不受gravity属性影响,因为gravity属性影响容器内所有的组件的对齐方式,设置了之后,该组件就可以例外;
2.LayoutParams属性
(1)只能设置boolean值的属性
这些属性都是相对父容器的,确定是否在父容器中居中(水平,垂直),是否位于父容器的上下左右端;
是否水平居中:
android:
layout_centerHorizontal;
是否垂直居中:
android:
layout_centerVertical;
是否位于中央:
android:
layout_centerInParent;
是否底端对齐:
android:
layout_alignParentBottom;
是否顶端对齐:
android:
layout_alignParentTop;
是否左边对齐:
android:
layout_alignParentLeft;
是否右边对齐:
android:
layout_alignParentRight;
(2)只能设置其它组件id的属性
位于所给id组件左侧:
android:
layout_toLeftOf;
位于所给id组件右侧:
android:
layout_toRightOf;
位于所给id组件的上边:
android:
layout_above;
位于所给id组件的下方:
android:
layout_below;
与所给id组件顶部对齐:
android:
layout_alignTop;
与所给id组件底部对齐:
android:
layout_alignBottom;
与所给id组件左边对齐:
android:
layout_alignLeft;
与所给id组件右边对齐:
android:
layout_alignRight;
3.梅花布局效果
五个按钮排成梅花形状,梅花处于正中心,效果图如下:
两个按钮,如果只有android:
layout_above="@+id/bt1"会是这种情况:
加上android:
layout_alignLeft="@+id/bt1"就会成为这种情况:
要点:
注意每个组件的属性,先要确定方位,再进行对齐,组件左边界对齐,组件上边界对齐;
代码:
xmlversion="1.0"encoding="utf-8"?
>
xmlns:
android="android:
layout_width="fill_parent"
android:
layout_height="fill_parent">
android:
id="@+id/bt1"
android:
layout_width="wrap_content"
android:
layout_height="wrap_content"
android:
text="按钮1"
android:
layout_centerInParent="true"/>
android:
id="@+id/bt2"
android:
layout_width="wrap_content"
android:
layout_height="wrap_content"
android:
text="按钮2"
android:
layout_above="@+id/bt1"
android:
layout_alignLeft="@+id/bt1"/>
android:
id="@+id/bt3"
android:
layout_width="wrap_content"
android:
layout_height="wrap_content"
android:
text="按钮3"
android:
layout_centerInParent="true"
android:
layout_below="@+id/bt1"
android:
layout_alignLeft="@+id/bt1"/>
android:
id="@+id/bt4"
android:
layout_width="wrap_content"
android:
layout_height="wrap_content"
android:
text="按钮4"
android:
layout_centerInParent="true"
android:
layout_toLeftOf="@+id/bt1"
android:
layout_alignTop="@+id/bt1"/>
android:
id="@+id/bt5"
android:
layout_width="wrap_content"
android:
layout_height="wrap_content"
android:
text="按钮5"
android:
layout_centerInParent="true"
android:
layout_toRightOf="@+id/bt1"
android:
layout_alignTop="@+id/bt1"/>
4.相对布局常用方法
(1)获取屏幕中一个组件的位置
要先创建一个整型数组,数组大小2位;这个数组传入getLocationOnScreen()方法;
可以调用View.getLocationOnScreen()方法,返回的是一个数组int[2],int[0]是横坐标,int[1]是纵坐标;
//获取组件
Buttonb=(Button)this.findViewById(R.id.Button01);
//创建数组,将该数组传入getLocationOnScreen()方法
intlocations[]=newint[2];
//获取位置信息
b.getLocationOnScreen(locations);
//获取宽度
intwidth=locations[0];
//获取高度
intheight=locations[1];
(2)LayoutParams的使用设置所有属性
属性设置方法少:
AndroidSDK中View类只提供了很少用于设置属性的方法,大多数属性没有直接对应的获得和设置属性值的方法,看起来貌似不是很好用;
使用LayoutParams设置属性值:
Android中可以对任何属性进行设置,这里我们需要一个LayoutParams对象,使用这个LayoutParams.addRule()方法,可以设置所有组件的属性值;设置完之后调用View.setLayoutParams()方法,创建刚才的LayoutParams对象,并更新View的相应的属性值;
代码中动态设置布局属性:
a.创建LayoutParams对象
b.调用LayoutParams对象的addRule()方法设置对应属性;
c.调用View.setLayoutParams()方法将设置好的LayoutParams对象设置给组件;
d.调用addView方法将View对象设置到布局中去;
使用代码设置android:
layout_toRightOf和android:
layout_below属性:
//装载布局文件
RelativeLayoutrelativeLayout=(RelativeLayout)getLayoutInflater().inflate(R.layout.relative,null);
//装载要动态添加的布局文件
Buttonbutton=(Button)relativeLayout.findViewById(R.id.bt1);
//创建一个LayoutParams对象
LayoutParamslayoutParams=newLayoutParams(LayoutParams.WRAP_CONTENT,
LayoutParams.WRAP_CONTENT);
//设置android:
layout_toRightOf属性
layoutParams.addRule(RelativeLayout.RIGHT_OF,R.id.bt2);
//设置android:
layout_below
layoutParams.addRule(RelativeLayout.BELOW,R.id.bt2)
 升级会员
升级会员 