Juniper SRX 防火墙透明模式配置手册Word下载.docx
《Juniper SRX 防火墙透明模式配置手册Word下载.docx》由会员分享,可在线阅读,更多相关《Juniper SRX 防火墙透明模式配置手册Word下载.docx(17页珍藏版)》请在冰点文库上搜索。
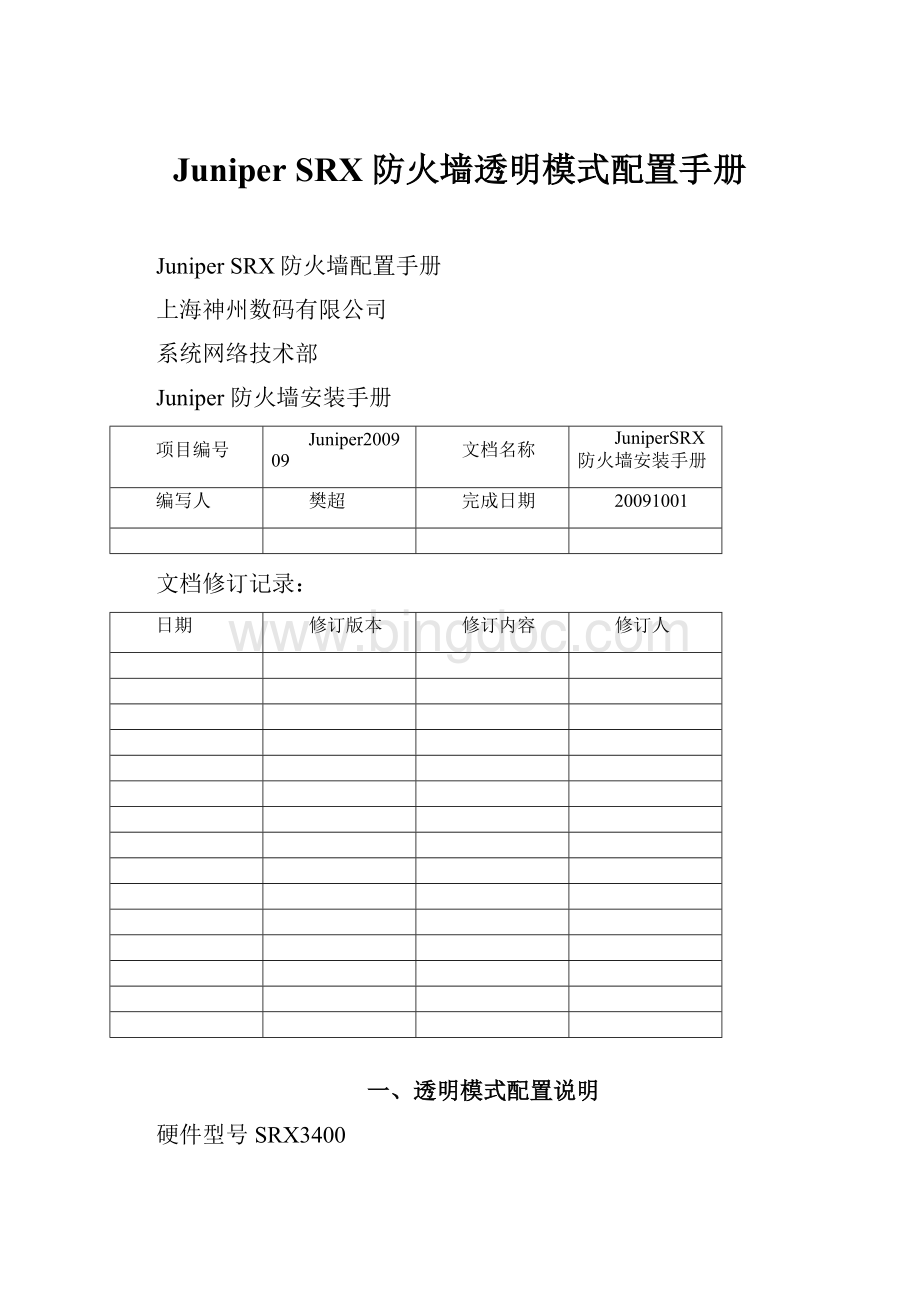
硬件型号SRX3400
软件版本9.6R1.13
配置案例图
•在上图中ge-0/0/0,ge-0/0/10,ge-0/0/8均让VLAN199-223穿过。
•GSR和cisco3750,6509之间通过上述vlan连通。
•在GSR、3750和6509之间运行3层协议(如ospf、static等)
•根据需求,在SRX上运行policy实现trust、DMZ和untrust流量控制
•Juniper防火墙作为透明模式部署需要建立3个区域,分别<
L2_Untrust>
、<
L2_Trust>
L2_DMZ>
1.1设置nodeID和clusterID
##在操作模式下输入,后面没有注明的则默认是在配置模式下操作
##SRX3400-1_L2配置为
setchassisclusternode0cluster-id1reboot
##SRX3400-2_L2配置为
setchassisclusternode1cluster-id1reboot
1.2防火墙系统全局配置(初始化配置)
##设置root的用户名和密码
system{
root-authentication{
encrypted-password"
$1$R7QtWpjt$OsUXw/4GC.7AiGO2bFHUz."
;
##SECRET-DATA
}
##添加用户名为lab的用户和密码
login{
userlab{
uid2000;
classsuperuser;
authentication{
$1$h54Sa7e3$cjwdMDkIcvEN89jSZ8eSa/"
}
##设置防火墙自己开启的服务
services{
ftp;
telnet;
web-management{
http;
syslog{
user*{
anyemergency;
filemessages{
anynotice;
authorizationinfo;
1.3建立集群
##双机配置,设置node0为主,node1为备。
##设置node0主机名
groups{
node0{
system{
host-nameSRX3400-1_L2;
backup-router192.168.2.1destination0.0.0.0/0;
##设置带外管理地址和带外管理的网关
interfaces{
fxp0{
unit0{
familyinet{
address192.168.2.254/24;
routing-options{
static{
route0.0.0.0/0{
next-hop192.168.2.1;
retain;
no-readvertise;
##设置node1主机名,带外管理地址和带外管理的网关
node1{
host-nameSRX3400-2_L2;
address192.168.2.253/24;
}
apply-groups"
${node}"
1.4设置cluster冗余组和接口对象
##设置reth-count数目及主机单元的优先级,并设置监控的端口和权重
chassis{
cluster{
reth-count3;
heartbeat-interval1000;
heartbeat-threshold3;
##redundancy-group0为引擎组对象,此处将所有业务接口都放到此组中,这样##设置的结果就是只要有一个业务接口down了,则引擎也进行切换,防止出现##业务接口进行了切换,而引擎没有切换的结果
redundancy-group0{
node0priority100;
node1priority1;
interface-monitor{
ge-0/0/10weight255;
ge-0/0/8weight255;
ge-8/0/8weight255;
ge-8/0/10weight255;
ge-0/0/0weight255;
ge-8/0/0weight255;
redundancy-group1{
##设置相关的物理接口与相应的logical接口reth关联
interfaces{
ge-0/0/0{
gigether-options{
redundant-parentreth2;
ge-0/0/8{
no-auto-negotiation;
redundant-parentreth0;
ge-0/0/10{
redundant-parentreth1;
ge-8/0/0{
ge-8/0/8{
ge-8/0/10{
##设置两台防火墙互联的接口
fab0{
fabric-options{
member-interfaces{
ge-0/0/7;
fab1{
ge-8/0/7;
irb{
unit220{
disable;
address192.168.1.10/28;
lo0{
address127.0.0.1/32;
##设置reth接口为trunk接口,所允许的vlan号
reth0{
vlan-tagging;
redundant-ether-options{
redundancy-group1;
familybridge{
interface-modetrunk;
vlan-id-list1-4094;
reth1{
reth2{
1.5设置安全区域和策略
##设置防火墙的安全区域,其中l2开头的代表两层,并把相关的reth接口同安全区域关联
security{
zones{
functional-zonemanagement;
security-zonel2-trust{
host-inbound-traffic{
system-services{
all;
protocols{
reth1.0;
security-zonel2-untrust{
reth0.0;
security-zonetrust;
security-zonel2-dmz{
reth2.0;
##设置防火墙的策略,目前各安全区域之间是全开放
policies{
from-zonel2-trustto-zonel2-untrust{
policytrust-untrust{
match{
source-addressany;
destination-addressany;
applicationany;
then{
permit;
from-zonel2-untrustto-zonel2-trust{
policyuntrust-trust{
from-zonel2-trustto-zonel2-trust{
policytrust-trust{
from-zonel2-trustto-zonel2-dmz{
policytrust-dmz{
from-zonel2-untrustto-zonel2-dmz{
policyuntrust-dmz{
from-zonel2-dmzto-zonel2-trust{
policydmz-trust{
from-zonel2-dmzto-zonel2-untrust{
policydmz-untrust{
alg{
ftpdisable;
tftpdisable;
1.6设置全局l2特性
##全局设置vlan透传
bridge-domains{
trunk199-223{
vlan-id-list199-223;
vlan001{
vlan-id1;
routing-interfaceirb.0;
{secondary:
node0}
 升级会员
升级会员 