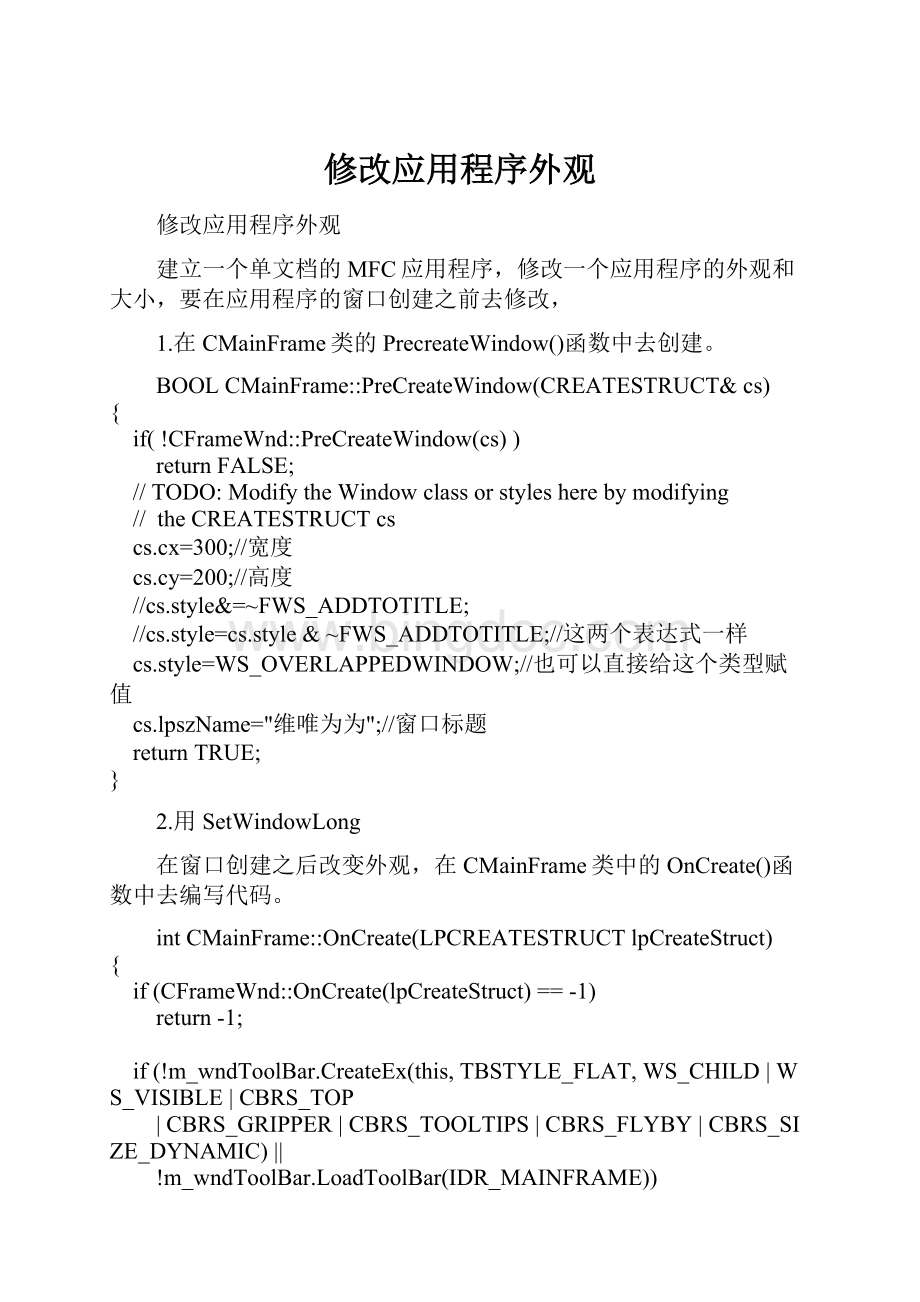
修改应用程序外观Word文档格式.docx
《修改应用程序外观Word文档格式.docx》由会员分享,可在线阅读,更多相关《修改应用程序外观Word文档格式.docx(19页珍藏版)》请在冰点文库上搜索。

by
modifying
CREATESTRUCT
cs
cs.cx=300;
//宽度
cs.cy=200;
//高度
//cs.style&
=~FWS_ADDTOTITLE;
//cs.style=cs.style
&
~FWS_ADDTOTITLE;
//这两个表达式一样
cs.style=WS_OVERLAPPEDWINDOW;
//也可以直接给这个类型赋值
cs.lpszName="
维唯为为"
;
//窗口标题
TRUE;
}
2.用SetWindowLong
在窗口创建之后改变外观,在CMainFrame类中的OnCreate()函数中去编写代码。
int
OnCreate(LPCREATESTRUCT
lpCreateStruct)
if
(CFrameWnd:
OnCreate(lpCreateStruct)
==
-1)
-1;
(!
m_wndToolBar.CreateEx(this,
TBSTYLE_FLAT,
WS_CHILD
|
WS_VISIBLE
CBRS_TOP
CBRS_GRIPPER
CBRS_TOOLTIPS
CBRS_FLYBY
CBRS_SIZE_DYNAMIC)
||
m_wndToolBar.LoadToolBar(IDR_MAINFRAME))
TRACE0("
Failed
to
create
toolbar\n"
);
fail
m_wndStatusBar.Create(this)
m_wndStatusBar.SetIndicators(indicators,
sizeof(indicators)/sizeof(UINT)))
status
bar\n"
Delete
these
three
lines
you
don'
t
want
toolbar
be
dockable
m_wndToolBar.EnableDocking(CBRS_ALIGN_ANY);
EnableDocking(CBRS_ALIGN_ANY);
DockControlBar(&
m_wndToolBar);
//修改窗口的外观
//SetWindowLong(m_hWnd,GWL_STYLE,WS_OVERLAPPEDWINDOW);
//修改现有窗口的类型
SetWindowLong(m_hWnd,GWL_STYLE,GetWindowLong(m_hWnd,GWL_STYLE)&
~WS_MAXIMIZEBOX);
//使最大化图标变灰
0;
}
3.编写自己的窗口类
在CMainFrame:
cs)函数中添加:
WNDCLASS
wndcls;
//定义一个窗口类
wndcls.cbClsExtra=0;
//类的额外内存,0,不需要
wndcls.cbWndExtra=0;
//窗口的额外内存,0,不需要
wndcls.hbrBackground=(HBRUSH)GetStockObject(BLACK_BRUSH);
//背景
wndcls.hCursor=LoadCursor(NULL,IDC_HELP);
//NULL,指定标准光标
//注:
要改变窗口的背景和光标要在View类中去改变,因View窗口覆盖在Frame窗口之上
wndcls.hIcon=LoadIcon(NULL,IDI_ERROR);
//图标
wndcls.hInstance=AfxGetInstanceHandle();
//获取当前应用程序的句柄
wndcls.lpfnWndProc=:
DefWindowProc;
//窗口过程用缺省的,函数名指函数的地址
wndcls.lpszClassName="
luowei.org"
//类的名字
wndcls.lpszMenuName=NULL;
wndcls.style=CS_HREDRAW|CS_VREDRAW;
//水平重画,垂直重画
RegisterClass(&
wndcls);
//注册窗口类
cs.lpszClass="
在CStyleView:
BOOLCStyleView:
cs)
{
//TODO:
ModifytheWindowclassorstylesherebymodifying
//theCREATESTRUCTcs
//修改窗口类
cs.lpszClass="
//修改成自己定义的类
returnCView:
PreCreateWindow(cs);
4.利用AfxRegisterWnd函数修改
PreCreateWindow中添加:
cs.lpszClass=AfxRegisterWndClass(CS_HREDRAW|CS_VREDRAW,0,0,LoadIcon(NULL,IDI_WARNING));
//cs.lpszClass=AfxRegisterWndClass(CS_HREDRAW|CS_VREDRAW)//设置成缺省值
AfxRegisterWndClass
LPCTSTRAFXAPIAfxRegisterWndClass(UINTnClassStyle,HCURSORhCursor=0,HBRUSHhbrBackground=0,HICONhIcon=0);
ReturnValue
Anull-terminatedstringcontainingtheclassname.YoucanpassthisclassnametotheCreatememberfunctioninCWndorotherCWnd-derivedclassestocreateawindow.ThenameisgeneratedbytheMicrosoftFoundationClassLibrary.
Note
Thereturnvalueisapointertoastaticbuffer.Tosavethisstring,assignittoaCStringvariable.
Parameters
nClassStyle
SpecifiestheWindowsclassstyleorcombinationofstyles,createdbyusingthebitwise-OR(|)operator,forthewindowclass.Foralistofclassstyles,seetheWNDCLASSstructureintheWin32SDKdocumentation.IfNULL,thedefaultswillbesetasfollows:
∙SetsthemousestyletoCS_DBLCLKS,whichsendsdouble-clickmessagestothewindowprocedurewhentheuserdouble-clicksthemouse.
∙SetsthearrowcursorstyletotheWindowsstandardIDC_ARROW.
∙SetsthebackgroundbrushtoNULL,sothewindowwillnoteraseitsbackground.
∙Setstheicontothestandard,waving-flagWindowslogoicon.
hCursor
Specifiesahandletothecursorresourcetobeinstalledineachwindowcreatedfromthewindowclass.Ifyouusethedefaultof0,youwillgetthestandardIDC_ARROWcursor.
hbrBackground
Specifiesahandletothebrushresourcetobeinstalledineachwindowcreatedfromthewindowclass.Ifyouusethedefaultof0,youwillhaveaNULLbackgroundbrush,andyourwindowwill,bydefault,noteraseitsbackgroundwhileprocessingWM_ERASEBKGND.
hIcon
Specifiesahandletotheiconresourcetobeinstalledineachwindowcreatedfromthewindowclass.Ifyouusethedefaultof0,youwillgetthestandard,waving-flagWindowslogoicon.
Remarks
TheMicrosoftFoundationClassLibraryautomaticallyregistersseveralstandardwindowclassesforyou.Callthisfunctionifyouwanttoregisteryourownwindowclasses.
ThenameregisteredforaclassbyAfxRegisterWndClassdependssolelyontheparameters.IfyoucallAfxRegisterWndClassmultipletimeswithidenticalparameters,itonlyregistersaclassonthefirstcall.SubsequentcallstoAfxRegisterWndClasswithidenticalparameterssimplyreturnthealready-registeredclassname.
IfyoucallAfxRegisterWndClassformultipleCWnd-derivedclasseswithidenticalparameters,insteadofgettingaseparatewindowclassforeachclass,eachclasssharesthesamewindowclass.ThiscancauseproblemsiftheCS_CLASSDCclassstyleisused.InsteadofmultipleCS_CLASSDCwindowclasses,youendupwithoneCS_CLASSDCwindowclass,andallC++windowsthatusethatclasssharethesameDC.Toavoidthisproblem,callAfxRegisterClasstoregistertheclass.
cs)中修改:
CStyleView:
//修改窗口类
//修改成自己定义的类
//修改背景和光标
cs.lpszClass=AfxRegisterWndClass(CS_HREDRAW|CS_VREDRAW,
LoadCursor(NULL,IDC_CROSS),(HBRUSH)GetStockObject(BLACK_BRUSH),0);
CView:
5.窗口创建之后,再创建图标,光标及背景
利用SetClassLong函数,在CMainFrame:
OnCreate(LPCREATESTRUCTlpCreateStruct)函数中添加:
//修改图标
SetClassLong(m_hWnd,GCL_HICON,(LONG)LoadIcon(NULL,IDI_ERROR));
修改光标和背景,对CStyleView类添加一个WM_CREATE消息响应,编辑:
(CView:
Add
your
specialized
creation
code
//修改背景
SetClassLong(m_hWnd,GCL_HBRBACKGROUND,(LONG)GetStockObject(BLACK_BRUSH));
//修改光标
SetClassLong(m_hWnd,GCL_HCURSOR,(LONG)LoadCursor(NULL,IDC_HELP));
6.实现动态图标
Insert->
资源->
导入三个图标,在CMainFrame类上定义三个用于存放图标句柄的数组,对CMainFrame类添加一个HICON类型的私有成员变量m_hIcons[3],并在CMainFrame:
OnCreate函数中支去加载图标:
extern
CStyleApp
theApp;
//声明这个变量是在外部定义的
..................
//加载图标
m_hIcons[0]=LoadIcon(AfxGetInstanceHandle(),MAKEINTRESOURCE(IDI_ICON1));
//方式一
m_hIcons[1]=LoadIcon(theApp.m_hInstance,MAKEINTRESOURCE(IDI_ICON2));
//方式二,theApp是外部的全局变量,在CMainFrame:
OnCreate函数之前要声明
m_hIcons[2]=LoadIcon(AfxGetApp()->
m_hInstance,MAKEINTRESOURCE(IDI_ICON3));
SetClassLong(m_hWnd,GCL_HICON,(LONG)m_hIcons[0]);
//将图标设置成引入的第一个图标
//设置定时器
SetTimer(1,1000,NULL);
再给CMainFrame类添加WM_TIMER消息处理,编辑:
void
OnTimer(UINT
nIDEvent)
message
handler
and/or
call
default
static
index=1;
//静态的变量是存放在数据区当中,而不是分配在栈当中
SetClassLong(m_hWnd,GCL_HICON,(LONG)m_hIcons[index]);
index=++index%3;
//让图标不断的循环变幻
OnTimer(nIDEvent);
7.工具栏的编程
在菜单Menu下IDR_MAINFRAME中添加一个菜单项Test,在图标Toolbar下IDR_MAINFRAME中添加一个图标。
ID号都取为:
IDC_TEST。
对Test菜单添加一个COMMAND消息响应函数,编辑:
voidCMainFrame:
OnTest()
Addyourcommandhandlercodehere
MessageBox("
Test"
在工具栏图标之间,添加分隔符,可以用鼠标左键拖住图标往左移一点即可;
可以用鼠标左键把图标拖出工具栏外边即可!
8.创建工具栏
在ToolBar上新建一个工具栏IDR_TOOLBAR1,并在CMainFrame.h中添加:
protected:
//controlbarembeddedmembers
CStatusBarm_wndStatusBar;
CToolBarm_wndToolBar;
CToolBarm_newToolBar;
//创建一个ToolBar
然后在CMainFrame:
OnCreate(LPCREATESTRUCTlpCreateStruct)中编辑:
//SetWindowLong(m_hWnd,GWL_STYLE,GetWindowLong(m_hWnd,GWL_STYLE)&
//修改图标
//SetClassLong(m_hWnd,GCL_HICON,(LONG)LoadIcon(NULL,IDI_ERROR));
m_hIcons[1]=LoadIcon(theApp.m_hInstance,